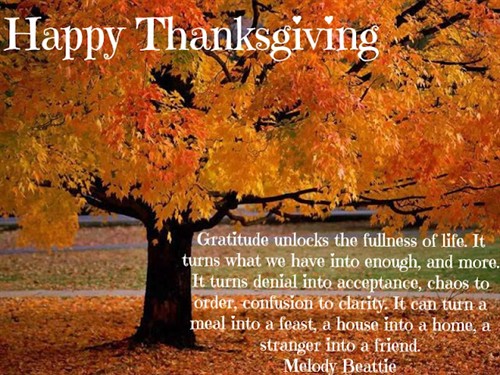
Thanksgiving it’s meaning, videos, recipes and more


Do you know the meaning of Thanksgiving?


friends-and-thanks-giving-2016On week 279 This post is about Giving thanks and yes enjoying the holiday also, let’s not forget to practice GRATITUDE!!! what really this holiday is really about, in our daily rush around we forget this action and it is so important to come from this place and in this post, we will share facts and studies that will guide you through  the power of giving thank from a deeper place.

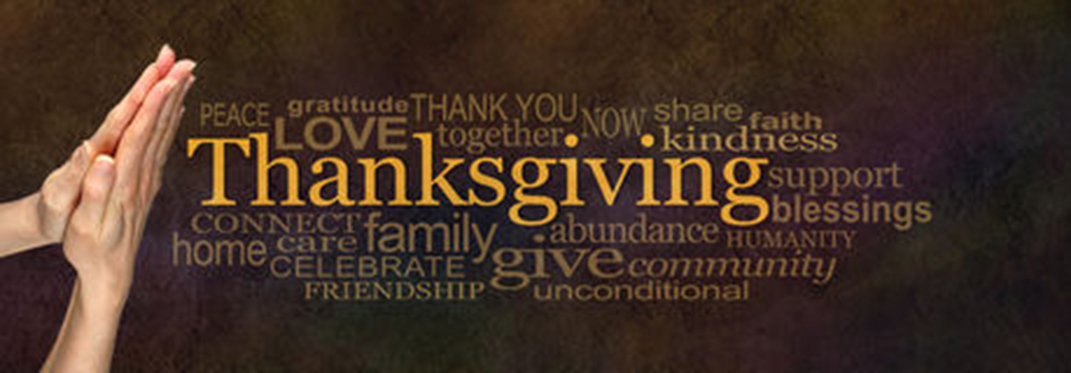
When we address GRATITUDE we move to an entirely different energy in our awareness and everything changes from this place we can source from thankfulness and appreciation for all and that wakes up kindness and love for all, is a great consciousness that we tend to overlook in our fast-paced lives, please share and thank you once again for all your support and shares ,with love, gratitude and respect from all of us at Isabel’s Beauty Blog enjoy your holiday and be safe.

gratitudegrat·i·tude


ˈɡradəˌt(y)o͞od/
noun
noun: gratitude
The quality of being thankful; readiness to show appreciation for and to return the kindness.
Synonyms:
gratefulness, thankfulness


Is gratitude a feeling or an emotion?

great-banner-for-gratitude

Gratitude is a personality trait, a mood, and an emotion. As an emotion, gratitude is a feeling of happiness that comes from the appreciation of it all. While in a grateful mood, grateful emotions are more likely to draw of the same. Gratitude is considered a core component of many believes.

While in a grateful mood, grateful emotions are more likely to be present and manifest more facts to be grateful for such is the law of attraction.

For now, it’s that time of year where many people begin thinking about everything they have to be thankful for and that is what I wish for. Although it’s nice to count your blessings on Thanksgiving, being thankful throughout the year could have tremendous benefits on our quality of life. and how we manifest more of what we are thankful for.
In fact, gratitude may be one of the most overlooked tools that we all have access to every day. Cultivating gratitude doesn’t cost any money and it certainly doesn’t take much time, but the benefits are enormous.

When we increased gratitude the common result is called practising mindfulness. As we start paying more attention to our thoughts and we became more aware, we notice where we block ourselves from appreciating the good things in life. For example, that you always used to get angry when stuck in traffic, but now when you bring your focus to where you are (rather than where you want to get to) you notice things such as the song on the radio or a beautiful scene beyond the car window and we detach from the feeling of powerless and enjoy life more, with gratitude we can manage the frustration of trying to control everything in our lives and the circumstances around us creating anxiety and much stress. We can’t feel grateful for things we don’t notice, and so mindfulness and gratitude go hand-in-hand.

thanksgiving-word-cloud-website-banner-female-hands-prayer-position-alongside-golden-surrounded-relevant-warm-dark-60489401

According to Wikipedia: https://en.wikipedia.org/wiki/Gratitude


Association with well-being

benefits-of-gratitude5

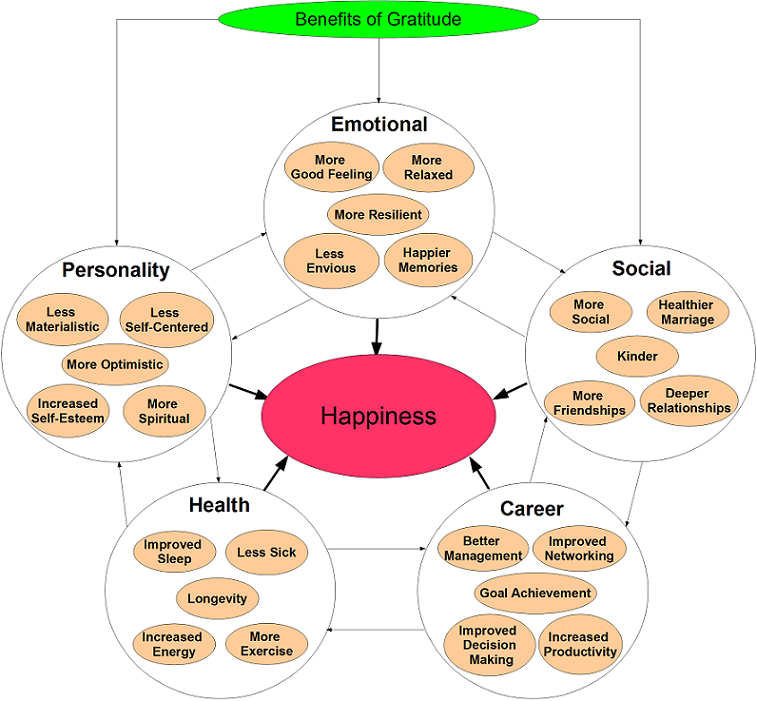
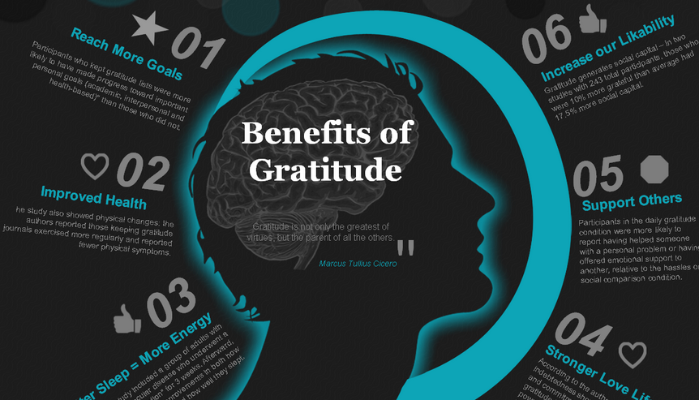
A large body of recent work has suggested that people who are more grateful have higher levels of subjective well-being. Grateful people are happier, less depressed, less stressed, and more satisfied with their lives and social relationships Specifically, in terms of depression, gratitude may serve as a buffer by enhancing the coding and retrievability of positive experiences. Grateful people also have higher levels of control over their environments, personal growth, purpose in life, and self-acceptance and Happiness. Grateful people have more positive ways of coping with the difficulties they experience in life, being more likely to seek support from other people, reinterpret and grow from experiences, and spend more time planning how to deal with the problem. Grateful people also have less negative coping strategies, being less likely to try to avoid the problem, deny there is a problem, blame themselves, or cope with substance abuse. Grateful people sleep better, and this seems to be because they think less negative and more positive thoughts.
Gratitude has been said to have one of the strongest links with the mental health of any character trait. Numerous studies suggest that grateful people are more likely to have higher levels of happiness and lower levels of stress and depression.
While many emotions and personality traits are important to well-being, there is evidence that gratitude may be uniquely important. First, a longitudinal study showed that people who were more grateful coped better with a life transition. Specifically, people who were more grateful before the transition were less stressed, less depressed, and more satisfied with their relationships three months later. Second, two recent studies have suggested that gratitude may have a unique relationship with well-being, and can explain aspects of well-being that other personality traits cannot. Both studies showed that gratitude was able to explain more well-being than the Big Five and 30 of the most commonly studied personality traits.


Psychological interventions

Given that gratitude appears to be a strong determinant of people’s well-being, several psychological interventions have been developed to increase gratitude.For example, Watkins and colleagues had participants test a number of different gratitude exercises, such as thinking about a living person for whom they are grateful, writing about someone for whom they are grateful, and writing a letter to deliver to someone for whom they are grateful. Participants in the control condition were asked to describe their living room. Participants who engaged in a gratitude exercise showed increases in their experiences of positive emotion immediately after the exercise, and this effect was strongest for participants who were asked to think about a person for whom they are grateful. Participants who had grateful personalities, to begin with, showed the greatest benefit by experiencing these gratitude exercises. In another study concerning gratitude, participants were randomly assigned to one of six therapeutic intervention conditions designed to improve the participants’ overall quality of life (Seligman et al., 2005). Out of these conditions, it was found that the biggest short-term effects came from a “gratitude visit” where participants wrote and delivered a letter of gratitude to someone in their life. This condition showed a rise in happiness scores by 10 percent and a significant fall in depression scores, results which lasted up to one month after the visit. Out of the six conditions, the longest lasting effects were associated with the act of writing “gratitude journals” where participants were asked to write down three things they were grateful for every day. These participants’ happiness scores also increased and continued to increase each time they were tested periodically after the experiment. In fact, the greatest benefits were usually found to occur around six months after treatment began. This exercise was so successful that although participants were only asked to continue the journal for a week, many participants continued to keep the journal long after the study was over and stay on that great feeling of Gratitude. Similar results have been found from studies conducted by Emmons and McCullough (2003) and Lyubomirsky et. all. (2005). See also gratitude journal.
Recently (2013), the Greater Good Science Center at the University of California, Berkeley, has been offering awards for dissertation-level research projects with the greatest potential to advance the science and practice of gratitude.

Gratitude, according to current research, can do anything from helping you to achieve your goals more fluidly, to improving your skills of empathy and resilience. Through a cutting-edge study supported by the John Templeton Foundation, Dr Robert Emmons et al engaged in a long-term project designed to accumulate and disseminate scientific data on the nature of gratitude and its potential impact on human health and well-being. What they discovered makes gratitude seem like a very good idea on several fronts.

This does not mean that grateful people deny or ignore life’s negative aspects, only that their feelings of thankfulness and appreciation act as a protective factor against life’s problems keeping them down. Resilience in the making!

 There is a sort of peace of mind that appears to come with an “attitude of gratitude,” “grateful individuals place less importance on material goods; they are less likely to judge their own and others success in terms of possessions accumulated; they are less envious of others; and are more likely to share their possessions with others, relative to less grateful persons.” Grateful people seem to find it easier to love what they have, they aren’t so preoccupied with the kinds of insecurities that come from “comparing and despairing” or “comparing their insides with everyone else’s outsides.

So as we can see GRATITUDE is life changing and beneficial on so many levels.


THANKSGIVING BECOMES AN OFFICIAL HOLIDAY


firstthanksgivingbig


Pilgrims held their second Thanksgiving celebration in 1623 to mark the end of a long drought that had threatened the year’s harvest and prompted Governor Bradford to call for a religious fast. Days of fasting and thanksgiving on an annual or occasional basis became common practice in other New England settlements as well. During the American Revolution, the Continental Congress designated one or more days of thanksgiving a year, and in 1789 George Washington issued the first Thanksgiving proclamation by the national government of the United States; in it, he called upon Americans to express their gratitude for the happy conclusion to the country’s war of independence and the successful ratification of the U.S. Constitution. His successors John Adams and James Madison also designated days of thanks during their presidencies.
In 1817, New York became the first of several states to officially adopt an annual Thanksgiving holiday; each celebrated it on a different day, however, and the American South remained largely unfamiliar with the tradition. In 1827, the noted magazine editor and prolific writer Sarah Josepha Hale—author, among countless other things, of the nursery rhyme “Mary Had a Little Lamb”—launched a campaign to establish Thanksgiving as a national holiday. For 36 years, she published numerous editorials and sent scores of letters to governors, senators, presidents and other politicians. Abraham Lincoln finally heeded her request in 1863, at the height of the Civil War, in a proclamation entreating all Americans to ask God to “commend to his tender care all those who have become widows, orphans, mourners or sufferers in the lamentable civil strife” and to “heal the wounds of the nation.” He scheduled Thanksgiving for the final Thursday in November, and it was celebrated on that day every year until 1939 when Franklin D. Roosevelt moved the holiday up a week in an attempt to spur retail sales during the Great Depression. Roosevelt’s plan, known derisively as Franksgiving, was met with passionate opposition, and in 1941 the president reluctantly signed a bill making Thanksgiving the fourth Thursday in November.


THANKSGIVING TRADITIONS

tradhead-50aac3ec5e8f6

In many American households, the Thanksgiving celebration has lost much of its original religious significance; instead, it now focous  on cooking and sharing a bountiful meal with family and friends. Turkey, a Thanksgiving staple so ubiquitous it has become all but synonymous with the holiday, may or may not have been on offer when the Pilgrims hosted the inaugural feast in 1621. Today, however, nearly 90 percent of Americans eat turkey for the most part—whether roasted, baked or deep-fried—on Thanksgiving, according to the National Turkey Federation. Other traditional foods include stuffing, mashed potatoes, cranberry sauce and pumpkin pie and pecan pie to mention a few dishes. Volunteering is a common Thanksgiving Day activity, and communities often hold food drives and host free dinners for the less fortunate.
As an annual celebration of the harvest and its bounty, moreover, Thanksgiving falls under a category of festivals that spans cultures, continents and millennia. In ancient times, the Egyptians, Greeks, and Romans feasted and paid tribute to their gods after the fall harvest. Thanksgiving also bears a resemblance to the ancient Jewish harvest festival of Sukkot. Finally, historians have noted that Native Americans had a rich tradition of commemorating the fall harvest with feasting and merrymaking long before Europeans set foot on their shores.


Fun facts about Thanksgiving


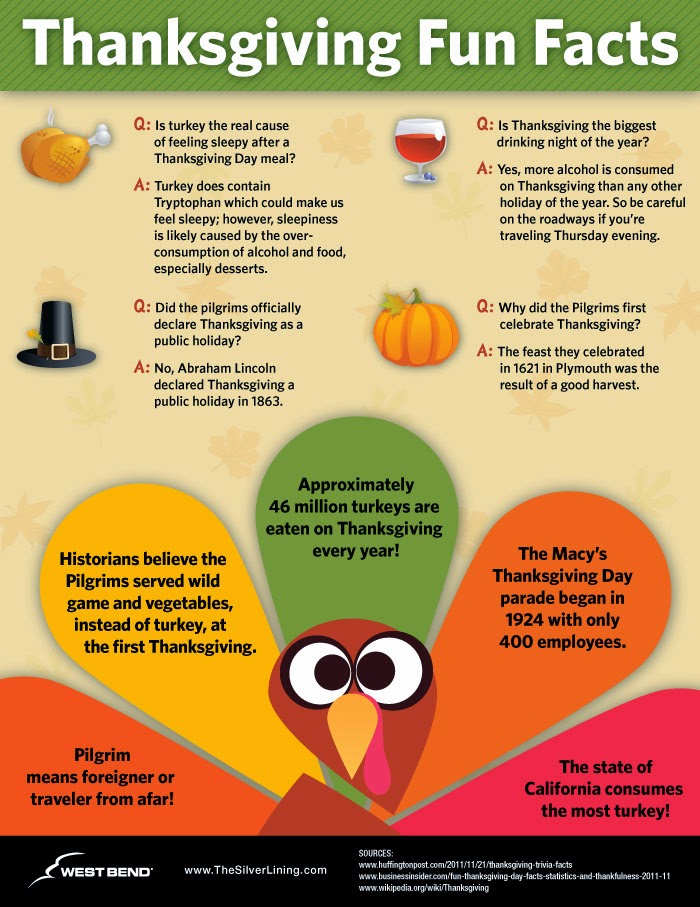
• The first Thanksgiving was held in the autumn of 1621 and included 50 Pilgrims and 90 Wampanoag Indians and lasted three days. Many historians believe that only five women were present at that first Thanksgiving, as many women settlers didn’t survive that difficult first year in the U.S.
• Thanksgiving didn’t become a national holiday until over 200 years later! Sarah Josepha Hale, the woman who actually wrote the classic song “Mary Had a Little Lamb,” convinced President Lincoln in 1863 to make Thanksgiving a national holiday, after writing letters for 17 years campaigning for this to happen.
• No turkey on the menu at the first Thanksgiving: Historians say that no turkey was served at the first Thanksgiving! What was on the menu? Deer or venison, ducks, geese, oysters, lobster, eel, and fish. They probably ate pumpkins, but no pumpkin pies. They also didn’t eat mashed potatoes or cranberry relish, but they probably ate cranberries.
• No forks at the first Thanksgiving! The first Thanksgiving was eaten with spoons and knives — but no forks! That’s right, forks weren’t even introduced to the Pilgrims until 10 years later and weren’t a popular utensil until the 18th century.
• Thanksgiving is the reason for TV dinners! In 1953, Swanson had so much extra turkey (260 tons) that a salesman told them they should package it onto aluminium trays with other sides like sweet potatoes — and the first TV dinner was born!
• Thanksgiving was almost a fast — not a feast! The early settlers gave thanks by praying and abstaining from food, which is what they planned on doing to celebrate their first harvest, that is until the Wampanoag Indians joined them and (lucky for us!) turned their fast into a three-day feast!
• Presidential pardon of a turkey: Each year, the president of the U.S pardons a turkey and spares it from being eaten for Thanksgiving dinner. The first turkey pardon ceremony started with President Truman in 1947. President Obama pardoned a 45-pound turkey named Courage, who has flown to Disneyland and served as Grand Marshal of the park’s Thanksgiving Day parade!
• Why is Thanksgiving the fourth Thursday in November? President Abe Lincoln said Thanksgiving would be the fourth Thursday in November, but in 1939 President Roosevelt moved it up a week hoping it would help the shopping season during the Depression era. It never caught on and it was changed back two years later.
• The Macy’s Thanksgiving Day Parade began in 1924 with 400 employees marching from Convent Ave to 145th street in New York City. No large balloons were at this parade, as it featured only live animals from Central Park Zoo.
• Turkey isn’t responsible for drowsiness or the dreaded “food coma.” So what
• is? Scientists say that extra glass of wine, the high-calorie meal or relaxing after a busy work schedule is what makes you drowsy!
• How did the tradition of watching football on Thanksgiving start? The NFL started the Thanksgiving Classic games in 1920 and since then the Detroit Lions and the Dallas Cowboys have hosted games on Turkey Day. In 2006, a third game was added to different teams hosting.
• Wild turkeys can run 20 miles per hour when they are scared, but domesticated turkeys that are bred are heavier and can’t run quite that fast.


Thanksgiving trivia quick facts — the speed round!

• Benjamin Franklin wanted the turkey to be the national bird, not the eagle.
• Americans eat 46 million turkeys each Thanksgiving.
• The heaviest turkey on record, according to the Guinness Book of Records, weighs 86 pounds.
• Californians consume the most turkey in the U.S. on Thanksgiving Day!
• Female turkeys (called hens) do not gobble. Only male turkeys gobble.
• The average turkey for Thanksgiving weighs 15 pounds.
• Campbell’s soup created green bean casserole for an annual cookbook 50 years ago. It now sells $20 million worth of cream of mushroom soup.

According to the U.S. Census Bureau, Minnesota is the top turkey-producing state in America, with a planned production total of 46.5 million in 2011. Six states—Minnesota, North Carolina, Arkansas, Missouri, Virginia, and Indinia—account for nearly two-thirds of the 248 million turkeys that will be raised in the U.S. this year.
The National Turkey Federation estimated that 46 million turkeys — one-fifth of the annual total of 235 million consumed in the United States—were eaten at Thanksgiving.
In a survey conducted by the National Turkey Federation, nearly 88 percent of Americans said they eat turkey at Thanksgiving. The average weight of turkeys purchased for Thanksgiving is 15 pounds, which means some 690 million pounds of turkey were consumed in the U.S. during Thanksgiving in 2007.
Cranberry production in the U.S. is expected to reach 750 million pounds in 2011. Wisconsin, Massachusetts, New Jersey, Oregon, and Washington are the top cranberry-growing states.
Illinois, California, Pennsylvania and New York are the major pumpkin-growing states, together they produced 1.1 billion pounds of pumpkin in 2010. Total U.S. production was over 1.5 billion pounds.
The sweet potato is most plentifully produced in North Carolina, which grew 972 million pounds of the popular Thanksgiving side dish vegetable in 2010. Other sweet potato powerhouses included California and Mississippi, and the top producing states together generated over 2.4 billion pounds of the tubers.
According to the Guinness Book of World Records, the largest pumpkin pie ever baked weighed 2,020 pounds and measured just over 12 feet long. It was baked on October 8, 2005 by the New Bremen Giant Pumpkin Growers in Ohio, and included 900 pounds of pumpkin, 62 gallons of evaporated milk, 155 dozen eggs, 300 pounds of sugar, 3.5 pounds of salt, 7 pounds of cinnamon, 2 pounds of pumpkin spice and 250 pounds of crust.

Three towns in the U.S. take their name from the traditional Thanksgiving bird, including Turkey, Texas (pop. 465); Turkey Creek, Louisiana (pop. 363); and Turkey, North Carolina (pop. 270).
Originally known as Macy’s Christmas Parade—to signify the launch of the Christmas shopping season—the first Macy’s Thanksgiving Day Parade took place in New York City in 1924. It was launched by Macy’s employees and featured animals from the Central Park Zoo. Today, some 3 million people attend the annual parade and another 44 million watch it on television.
Tony Sarg, a children’s book illustrator, and puppeteer designed the first giant hot air balloons for the Macy’s Thanksgiving Day Parade in 1927. He later created the elaborate mechanically animated window displays that grace the façade of the New York store from Thanksgiving to Christmas.
Snoopy has appeared as a giant balloon in the Macy’s Thanksgiving Day Parade more times than any other character in history. As the Flying Ace, Snoopy made his sixth appearance in the 2006 parade.
The first time the Detroit Lions played football on Thanksgiving Day was in 1934, when they hosted the Chicago Bears at the University of Detroit stadium, in front of 26,000 fans. The NBC radio network broadcast the game on 94 stations across the country–the first national Thanksgiving football broadcast. Since that time, the Lions have played a game every Thanksgiving (except between 1939 and 1944); in 1956, fans watched the game on television for the first time.
A lot of cranberries are needed to accompany all that turkey on Thanksgiving. In all, 768 million lbs. (350 million kilograms) of cranberries were produced in the United States last year. Two states — Wisconsin and Massachusetts — were responsible for most of the production, producing 450 million and 210 million lbs. (200 million and 95 million kg) of cranberries, respectively.

How sweet it is
Satisfying America’s sweet tooth takes a few billion pounds of sweet potatoes. Last year alone the United States produced 2.6 billion lbs. (1 billion kg) of sweet potatoes. North Carolina led production with 1.2 billion lbs. (0.5 billion kg).

thanksgiving-infographic

Great Thanksgiving recipes


Green Chile Cornbread

Author: Nava
Recipe type: Pan quick bread
Cuisine: Vegan / Healthy
Prep time:  15 mins
Cook time:  25 mins
Total time:  40 mins
Serves: 12
This moist vegan cornbread, spiked with green chile peppers, is an ideal companion to bean dishes, stews, and another hearty fare.
Ingredients
  • 1 cup cornmeal, preferably stone ground
  • 1 cup whole wheat pastry flour or spelt flour
  • 1 teaspoon baking soda
  • ½ teaspoon baking powder
  • 1 teaspoon salt
  • 6-ounce container plain coconut yoghurt or ¾ cup applesauce
  • ¼ cup olive oil
  • ⅓ cup unsweetened nondairy milk or more as needed
  • 1 to 2 small fresh hot chile peppers, seeded and minced, or one 4-ounce chopped mild green chillies
  • ½ cup frozen corn kernels, thawed
  • ¾ cup grated vegan cheddar cheese, optional (but highly recommended!)
Instructions
  1. Preheat the oven to 400 degrees F.
  2. Combine the first 6 (dry) ingredients in a mixing bowl and stir together.
  3. Make a well in the center of the dry ingredients. Pour in the yoghurt or applesauce, oil, and half of the rice milk. Stir until well combined, adding just a bit more nondairy milk if needed to make a smooth, slightly stiff batter, but don’t let the batter be too wet.
  4. Stir in the chillies and corn kernels.
  5. Pour the mixture into an oiled 9-inch-square baking pan. Bake for 20 to 25 minutes, or until the top is golden and a knife inserted in the center tests clean.
  6. Let cool slightly; cut into 3 sections in one direction and 4 in the other to create 12 squares. Serve warm.

Read more at


VEGAN STUFFINGS


Cranberry-Pear Wild Rice Stuffing
Author: Nava
Recipe type: Bread stuffing / Thanksgiving
Cuisine: Vegan / Healthy
Prep time:  20 mins
Cook time:  35 mins
Total time:  55 mins
Serves: 8 to 10
Wild rice adds a wonderful texture to this stuffing, and the slight sweetness of dried cranberries lends a delicious flavor.
Ingredients
  • 2½ cups prepared vegetable broth or 2½ cups water with 1 vegetable bouillon cube
  • ⅔ cup raw wild rice
  • 1½ tablespoons olive oil
  • 1 medium red onion, chopped
  • 1 large celery stalk, diced
  • 2 medium firm pears (such as bosc), cored and diced
  • 4 cups finely diced whole grain bread
  • ⅓ cup dried cranberries
  • ¼ cup finely chopped pecans or walnuts
  • 1 tablespoon salt-free seasoning blend (like Frontier or Mrs Dash)
  • ¼ to ½ teaspoon dried thyme, to taste
  • Salt and freshly ground pepper to taste
  • ½ cup apple or pear juice, or as needed
Instructions
  1. Bring the broth to a simmer in a small saucepan. Stir in the wild rice, then cover and simmer gently until the water is absorbed, about 35 minutes.
  2. Preheat the oven to 375 degrees F.
  3. Heat the oil in a medium-sized skillet. Add the onion and sauté until translucent. Add the celery and sauté over medium heat until both are golden.
  4. Combine the onion-celery mixture with the cooked wild rice and all the remaining ingredients except the apple juice in a mixing bowl. Stir well to combine.
  5. Drizzle the apple juice in slowly, stirring all the while until the mixture is evenly moistened.
  6. Transfer the mixture to a lightly oiled large shallow baking dish. Bake for 30 to 35 minutes, or until the top begins to get slightly crusty.


Vegetable Bread Pudding


Serves: 6

  • 5 slices crusty, dense whole grain bread, torn into small pieces
  • 1/2 cup unsweetened rice milk or other nondairy milk
  • 1 tablespoon olive oil
  • 1 large onion, finely chopped
  • 4 to 5 cups finely chopped vegetables of your choice (see options, below)
  • 1 grated mozzarella- or cheddar-style nondairy cheese
  • 1/4 cup vegan mayonnaise
  • 1/4 cup chopped fresh parsley
  • 1 tablespoon minced fresh dill or 1/2 teaspoon dried
  • 1/2 teaspoon paprika
  • 1/2 teaspoon dried basil or thyme
  • Salt and freshly ground pepper to taste
  • Sesame or poppy seeds for topping

Preheat the oven to 375 degrees F.

Place the torn bread in a mixing bowl and pour the nondairy milk over it. Stir to moisten the bread, then set aside until needed.

Heat the oil in a large skillet. Add the onion and sauté over medium-low heat until the golden and just beginning to turn brown.

Add the vegetables of your choice and just enough water to keep the skillet moist; cover and steam until just tender, 5 to 8 minutes. Drain off any liquid that has remained.

Combine the vegetable mixture with the bread in the bowl and stir in the remaining ingredients. Mix well, then transfer to a shallow 1 1/2-quart baking dish. Sprinkle some sesame seeds over the top.

Bake for 35 to 40 minutes, or until the top is golden and just beginning to turn crusty. Let stand for 5 to 10 minutes, then cut into squares or wedges to serve.


VEGETABLE OPTIONS:


You can use a single vegetable, or combine two or three. You’ll need a total of 4 to 5 cups raw vegetables, prepared as instructed below.

  • Broccoli, finely chopped and steamed
  • Cauliflower, finely chopped and steamed
  • Small zucchini, thinly sliced
  • Peeled and diced eggplant, steamed
  • Firm, ripe tomatoes, diced
  • Corn kernels (cooked fresh or thawed frozen)
  • Mushrooms, cleaned and sliced

Read more at http://www.vegkitchen.com/recipes/vegetable-bread-pudding/#WMZKyWL2GdAA0rjI.99


6753af_around-the-world-wine-chest

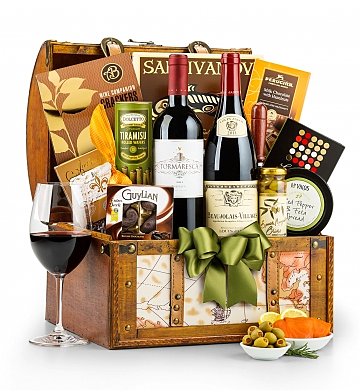
Around the World Wine Chest

A world map keepsake chest holds French Beaujolais Burgundy, rich Italian Tormaresca red, and an unforgettable menu of globe-spanning fare.

21856a_indulgent-harvest-crate

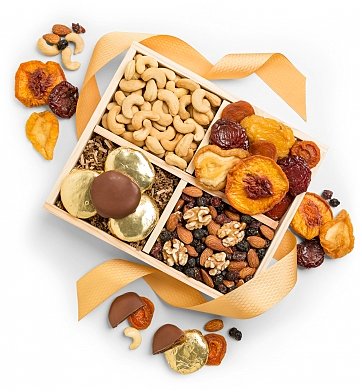
Indulgent Harvest Crate

An enduring crate features an open window glimpse into healthy indulgence – dried stone fruits, fresh jumbo cashews, chocolate dipped apricots and more.

3759074-p-multiview

Kenneth Cole New York Chevron Quilted Coat with Fur Hood

You’ll stay warm, cozy, and stylish in this Kenneth Cole New York® jacket.

3218020-p-multiview

UGG Becket

Get ready to stomp through cold-weather temps with the Becket boot from UGG®.


UGG Braiden

Bring a vintage vibe to your look with the style-savvy UGG® Braiden boot!


UGG Patten

Prepare yourself for a winter wonderland getaway with these sweet and cozy boots from UGG®!


SaveSave

SaveSave

SaveSave

SaveSave

SaveSave

SaveSave

SaveSave


Eye Longevity, exercises, videos, facts

Eye Longevity 


Wishing you all the health, happiness and ideal wealth you deserve. We are sending you much gratitude for all the support and likes, they are well appreciated by all of us we dedicate many hours of work to bring you the top content, thank you and please share and like if you do.

Here on week 278 are sharing a post about eyes, I had a challenge that lasted almost two years and came to find that I only needed a small amount of my dedication and some healthy research and it was over.If the question here is what is this Post has to do with beauty? well very simple if our eyes are not healthy we won’t be looking very beautiful correct? For me is important to give the eyes their full value and be aware how they are built, what they do and how to keep them healthy and without the aid of glasses which  I still don’t need. For a while, I was very concerned that my ability to see and work with my eyes as consistently as I do. It was in a period of challenge that this privilege was out of my control, not my favourite feeling, with that being said, I started my research and came up with a system that really worked and here I am sharing it with all of you, for some reason we humans tend to wait until is a big  challenge to take charge and pay attention to some of these big gifts that we shouldn’t take for granted, so here I would like to offer you the choice to prevent any of these issues, and have healthy eyes ! Enjoy.


https://youtu.be/itfuva1xgEg

The Eyes are the doorways to the soul

Eyes have for very long been referred to as the “Windows of the Soul.” But few people are aware of just how true this observation is. The accurate analysis of the iris structure and pigmentation provides information about your inner state of health that is hard to find through other methods. This is a higher value information is so valuable that Iridology deserves to become a widely practised assessment tool in both the physical and psychological health fields because it has the capacity to assess both. There is a multitude of challenges that influence our health and personality, and many of these factors are reflected in the iris. If you look closely at your eyes in a mirror, and then at the irises of those around you. You will see so many different patterns of iris fibres and colours. As fingerprints or faces, no two are exactly alike and is the same with our inner and outer stats we are individuals! The iris structure is so very unique; that is now being used for security identification at ATM machines and airports, and other forms of Governmental security systems. Microsoft’s house gearing up for the future will use an eye scanner to identify residents and unlock their home door.

They are connected to the entire nervous system, Which gives them a special importance.  In Taoism the eyes are regarded as the yang energy that guides all the chi flow in our body. The different areas of the eyes correspond to different organs of the body consequently they reveal the health of your entire body: through your eyes, you can tell which organs are weak or have challenges. Nowadays people use their eyes much more than in the past to read, watch television, and work with computers, and other electronic devices. This strains them a great deal and allows much of the energy of the connected organs to be drained out. Massaging the eyes will reenergize the vital organs.


iridology_chart_large


How do children inherit eye color? Can a child’s eye color be predicted? Why are an albino’s eyes pink? How can two brown eyed parents produce a blue-eyed child? Why are my eyes a darker blue than my siblings? How are the colors in the iris formed? These are questions one may have wondered from time to time. The answer to all of these question lies in the genes inherited from one’s parents.

Different eye colours are produced because of the different amounts and patterns of pigment in the iris. The amount of pigment and the pattern of the pigment is determined by a person’s genetic makeup. The DNA received from one’s parents determines what colour eyes they will have.

Each human has 46 chromosomes located in the nucleus of the cell. These are divided into 23 pairs of chromosomes. A baby inherits one chromosome from each parent in each pair of chromosomes. A piece of DNA on a chromosome is called a gene. Genes are the basic unit of heredity, they determine many characteristics about a baby. Genes also come in pairs. Alleles are found in genes and determine the appearance of any characteristic. There are two alleles for each trait inherited. If the two alleles are the same then they are homozygous for that gene. If the alleles are different, then they are called heterozygous. One allele is expressed over the other allele. This is called the dominant allele, the unexpressed allele is called recessive. For example, if there was a brown allele and a blue allele, the brown is dominant so the person would have brown eyes. But not just one pair of genes can control a single trait. Right now there are three known gene pairs that control eye colour. The bey 2 gene on chromosome 15 contains a brown and blue allele. Also on chromosome 15, the bey 1 gene is the central brown gene. On chromosome pair 19 the gey gene contains a green allele and a blue allele.

A green allele is dominant over a blue allele, and a brown allele is dominant over both green and blue alleles. For the bey 2 genes if a person has a brown allele then they will have brown eyes. In the gey gene, the green allele is dominant over the blue allele, but it is still recessive next to a brown allele. For example, if a person has a brown allele on chromosome 15, but all the other alleles are blue or green, they will have brown eyes. A green-eyed person would have a green allele on chromosome 19 and all or some other blue alleles. Blue eyes are produced only with two blue eye genes. All four alleles must be blue to produce a blue-eyed person.

Another way of predicting the colour of a child’s eyes is to use the parent’s eye colour genes. If both parents have a blue and brown gene, their eyes are brown, but if the child inherits the blue gene from each parent then the child will have blue eyes. If the child only inherits one blue gene then they will have brown eyes. The genetics determine what colour a child will have, but how exactly does this colour form in the eye?

Melanin, a pigment also found in the skin, is the substance that produces the eye colours specified by the genes. The amount and placement of the melanin produce the different eye colours that we see. Melanin is a dark brown pigment that is placed in the iris. The more melanin used in the iris means the darker the eye colour will appear, the less melanin used means that the eye colour will be lighter. The genes tell the enzymes how much melanin to deposit in the iris. A newborn’s eyes appear blue but may darken over the next few years. Melanin production has not begun at the time of birth. A child’s true eye colour cannot be determined until the age of three.

There are two layers to the iris, the anterior and the external, or front and back layers. To produce blue eyes, there is no pigment found in the front layer. The brown pigment melanin is deposited in the back layer only. It appears blue because of reflection and diffraction of light. In green eyes, a small amount of melanin is deposited in the front layer of the iris along with the melanin found in the back layer. The additional pigment to the amount needed for blue eyes, causes the eye to appear green. To produce grey eyes, the dark pigment is distributed in the front layer of the iris and over the blue background, it appears grey. In brown eyes, there is so much pigment in the front layer, that the blue behind is completely covered up. Some people have so much pigment in the front layer that their eyes appear very dark brown or black. Hazel, blue-green, grey-blue eye colours are produced by different amounts of pigmentation and the pattern in which the pigment is placed. Albino eyes have no pigment at all in either layer of the iris. The iris appears pink or red because of the reflection of blood vessels in the back of the eye. The pattern in which the pigment is deposited is also determined by genetics. The pigment may be deposited in rings, clouds, radial stripes, or spread over the entire iris.

A person’s eye colour is determined by the genes inherited from their parents. The types of alleles received from the parents are assigned to certain chromosomes. The dominant genes are expressed and the recessive genes are hidden. In the development of the iris, those genes tell enzymes to produce and place a certain amount of melanin in the iris to form the eye colour.

Performing Eye Massage 

According to Taoist Master Mantak Chia


Begin with the procedure for bringing energy to the hands and face. When your hands and face are hot, direct the chi to both eyes until you feel them filled with energy.

1.Close your eyes. Use your fingertips to gently massage your eyeballs through your closed eyelids, six to nine times clockwise then six to nine times counterclockwise. Then gently massage the area around the lids the same number of times. Be aware of painful spots and massage those places until the pain goes away. pay special attention to the inner and outer corners of the eyes. Massaging these points of the Gallbladder meridian will relieve eye ailments. However, when rubbing near the corners of the eyes, do not rub too hard, because you can make the corners of the eyes droop down. finish with rubbing the corners of the eyes upward.

2.Pull up the eyelids to increase the fluid. Use the thumb and index finger to gently pinch and pull up the eyelids, then release them. Do this six times.

3.Massage the eye sockets by bending your index fingers and using the lower section to rub the upper and lower bones of the eye sockets six to nine times

4.The next step is to get a tear out of your eyes, which will strengthen them. Hold an index finger up about eight inches from your eyes (or put a dot on the wall five to six feet away from you). Stare at it intently without blinking until you feel like a fire is burning in your eyes The Taoists believe that this technique burns the toxins out of the body through the eyes.

5.Bring Chi to your eyes by rubbing your hands until they are warm, then closing your eyes and covering your eye sockets with your palms. Feel the chi from the hands being absorbed into the eyes. Rotate your eyes six to nine times, first in a clockwise direction, then counterclockwise.


Eye Exercises for Relaxation


I read from an eye doctor, Dr Bates, who over 90 years ago contributed many natural ways to improve eyesight and was famous for getting rid of his patients’ glasses in a minute when in his office so they would no longer wear them. I’m sure the glasses smashing was not very well received and didn’t increase his popularity, but many patients flocked to him with the hope of avoiding glasses and he was quite sure that with proper exercise and relaxation, eyesight could improve in many cases.

The theory that he based this fact came from the idea that the muscles that surround the eye can become unbalanced and cause strain or even pull the eye to one side or another, leading to vision issues. Modern ophthalmologists argue with this idea, saying that it is the rods and cones in the eye that determine vision problems and that muscle tightness does not affect vision, even do they absolutely confirm the fact that is evidence that relaxation practices CAN help since increased use of with electronics screens is taxing to the eyes and does cause strain, a bit of contradiction wouldn’t you say?.


Here are some examples of eye strains:


  • Reading for long periods of time, especially small print and low light
  • Not enough exposure to natural light
  • Tension or strain of the eyes too much worries, stress
  • Long amounts of time spent looking at close up print versus looking at a distance
  • Looking at digital device screens
  • Reading without pausing to rest your eyes
  • Driving long distances and engaging in activities involving extended focus
  • Being exposed to bright light or glare ( Phone, Tablets, too much TV, computers etc)
  • Straining to see in very dim light
  • Having an underlying eye problem, such as dry eyes or uncorrected vision (refractive error)
  • Being stressed or fatigued as a way of life
  • Exposure to dry moving air from a fan, heating or air-conditioning system, not enough time in nature with natural light and fresh air.

The extended use of computers and other digital devices is one of the most common causes of eyestrain ( Mayo Clinic research). The American Optometric Association calls this computer vision syndrome or digital eye-strain. People who look at screens two or more hours in a row every day are at greatest risk of contracting this condition.


Long periods of computer use strains eyes more than reading print material because people tend to:


  • Blink less while using computers (blinking is found to be key to moistening the eyes)
  • The fact of viewing digital screens at less-than-ideal distances or angles with most like it not many breaks to focus on far viewing.
  • Use devices that have glare or reflection and no screen protection against it.
  • The Use of devices with poor contrast between the text and the background.


eye exercises1


The eyes have many muscles that we typically do not exercise very much. This causes them to become weak, contributing to poor eyesight. In addition, the eyes are closely connected with certain organs and nerves. Exercising the eyeballs not only is the best exercise for the eye muscles but also will exercise these linked areas by putting pressure on them: Contracting the middle of the eyeballs strengthens the back of the eye muscles and the inner ear. Moving the eyeballs upward by looking toward the crown strengthens the upper eye muscles and stimulates the pituitary and pineal glands. Moving the eyeballs from side to side strengthens the side eye muscles as well as the ear canals, eardrums, tear ducts, and nose. Moving the eyes downward strengthens the lower eye muscles as well as the lower parts of the ear canals and the nervous system.


eyemassagepoint1


Chrysanthemum Tea


11-27-14 chrysanthemum-tea-1200x900


The chrysanthemum has long been used in traditional Chinese medicine (TCM) for eye care. The flower is beneficial for correcting imbalances in kidney and liver function that is a cause of dry eyes, blurred vision, dizziness, spots in front of the eyes and excessive tearing.

 A warm infusion of chrysanthemum flowers may be helpful in relieving eyestrain, blurry vision, dry eyes and any eye issues in general. In addition, it is thought to help prevent and possibly reverse cataracts, according to the “The Green Pharmacy Herbal Handbook.” You can drink the tea or apply hot compresses for relief from aching, tired eyes. If you have the actual chrysanthemum blossoms, soak them in hot water for a few minutes and make a poultice by placing them between two pieces of gauze. Place a poultice on each eyelid and relax for 10 minutes for relief from eye pain. Speak to your herbalist or practitioner before using chrysanthemum for eye treatments.


 Drinking Chrysanthemum tea can:

1. Detoxifies the blood, helps with sinus congestion and regulates high blood pressure. It can also help to calm the nerves.

2. Restrains the growth of bacteria – like Staphylococcus aureus, Streptococcus hemolyticus B, Pseudomonas aeruginosa, Shigella dysenteriae, tubercle bacillus and dermatomycosis – in the body.

3. Brings relief against influenza and treats heatstroke, due to its cooling effect.

4. Facilitates digestion and apt after having greasy and oily foods.

5. Helps to strengthen lungs and relieve head congestion.

6. Improve vision and hearing and especially recommended for those who work long hours in front of a computer.

7. Good for obese people, as it contains zero calories when consumed without adding sugar or honey. It also doesn’t contain any caffeine.

8. It also treats dizziness and acts as a stimulant.

9. It helps to cure pimples and fight acne.

Eye supplements 


Lutein is an antioxidant carotenoid a pigmented nutrient that is responsible for the yellow colours of fruits and vegetables and is present in the highest quantities of dark, leafy green vegetables. You’re born with a certain amount of lutein in your eye, but your body doesn’t reproduce it.


Why is lutein important to my sight?


The macula is the region of the retina responsible for central vision. It’s also the area that is most sensitive to blue light, the part of the visible light spectrum that, along with ultraviolet light, can damage your eyes. Lutein helps protect against this damage by filtering blue light before it can damage the macula.* If sunglasses are the first line of defence against blue light, lutein is the last.


How much lutein do I need?


Without adequate consumption, the amount of lutein in the eye may deplete with age. Leading doctors recommend you get at least 6 mg of lutein per day to help maintain proper eye health. Since your body doesn’t make lutein, you must constantly replace it with the foods you eat. Dark, leafy green vegetables like spinach or kale are especially good sources. But you’d have to eat over 2 bowls of raw spinach every day to get the recommended daily dose of 6 mg of lutein. Taking a multivitamin may help, but many multivitamins contain only a fraction of the recommended 6 mg of lutein. In fact, the leading multivitamin contains just .25 mg of lutein − a mere 4% of the recommended amount.


The Eyes: A direct extension of the liver


The eyes have been referred to by many cultures as ” The windows of the soul.” According to Chinese medical theory, the eyes are the gate of the liver and are controlled by the liver system.  The eyes are the bridge between the liver and the outside world. They are an outward expression of the health state of the liver.

Healthy functioning of the liver allows the eyes to distinguish colours. A common clinical condition where this situation is most evident in the Western medical diagnosis of retinitis pigmentosa and colour-blingness. In this circumstance colour perception is not clearly distinguishable from the eyes, indicating poor liver function. When a person is experiencing any chronic and /or degenerative problem with vision the liver is always involved on some level because in Chinese medicine “the liver opens into the eyes.”


Here is a tool you can use to help with eye massage


Eye exercise machine 11-27-14


pangaO Eye Massager PG-2404G1 Air pressure massage Temple Acupressure + free gift


Enhance and maintain eye health

Eliminates computer eye syndrome

Fatigue elimination and sound sleep


SaveSave

SaveSave

SaveSave

SaveSave

SaveSave

SaveSave

SaveSave

SaveSave

SaveSave

SaveSave

SaveSave

SaveSave

SaveSave


History of Nail Polish Facts, Videos, and More


History of Nail Polish Facts,Videos, and More


Hello everyone thank you for your support we are truly grateful for all your support, on week 277 we are sharing a post on the history of Nail Polish, from its origins to now, wow very interesting the developing of it and how much it has changed through the times, I am personally very thankful that it has because there were very toxic materials used to manufacture these products so nail polish has come a long way.

I usually let my nails breathe especially in winter. I only use nail polish for an event. I prefer it I am usually doing many activities with my hands and the nail polish doesn’t last me and I don’t favor the chipped nail polish look. With that said here, we go with the post enjoy and please share so other people can learn about it.


Nail polish originated in China, and its use dates back to 3000 BC. Around 600 BC, during the Zhou dynasty, the royal house preferred the colors gold and silver. However, red and black eventually replaced these metallic colors as royal favorites. During the Ming dynasty, nail polish was often made from a mixture that included beeswax, egg whites, gelatin, vegetable dyes, and gum Arabic.history of nails


A Time-Consuming Process

from:http://classroom.synonym.com/origin-nail-polish-9845.html
While modern nail polish typically dries in a matter of minutes, that definitely wasn’t the case with the rudimentary versions made in ancient China. Once women painted their nails, they typically had to wait for several hours. Some women even went to sleep hoping for it to dry fully by the morning.

Zhou Dynasty and Nail Polish

china nails

During the Zhou Dynasty of the 11th to 3rd centuries B.C., women of different classes wore nail polish, whether they were privileged or not. Nail polish color denoted the social status of a woman. In 600 B.C., royals painted their nails with silver and gold. Average Chinese women were permitted to wear light pink nail polish. The consequences of not abiding by the color regulations were extremely severe. Any lower-class Chinese girl who painted her fingernails in royal colors would have faced the death penalty. By the time of the Ming Dynasty (14th to 17th century), royal nail polish color preferences had switched to red and black.


Nail Polish in Ancient Egypt


Although the Chinese were pioneers in the origins of nail polish, Egyptian women (and men too) were also coloring their nails by 3000 B.C. Their methods for painting their nails differed from the formulas used by the Chinese, but the color still signified social status, with deep red hues reserved for those of high rank. Ancient Egyptians often immersed their fingertips in reddish-brown henna, a type of dye extracted from flowering plants. Cleopatra, for one, was a big fan of henna for nail coloring. Ancient Egypt also produced some nail polish blends that were lacquer-like in a formula. Egyptian women frequently used berries to color their nails, too.


Ancient pigments


from: http://www.nailbargamax.it/the-history-of-nail-polish.html
Different materials, techniques, and colors have transformed the use of nail polishes, always in line with the evolution of tastes and trends. The origins of Nailart were India and China. The history of ancient and millennial civilization. During the Bronze Age, the henna, obtained from the powder of dried leaves, starts to be used also for nails decoration and in 1500 B.C,  in Mesopotamia, China, and Egypt, appear the first nail polishes, obtained from a mix of powders of crystal, malachite, and sulfur.

egypt

Nefertiti and Cleopatra are remembered, among other things, as two of the most beautiful women of their time. It is no surprise, then, that they were the first to make something as iconic as red nail polish famous! During their respective reigns, a societal hierarchy was indicated by the specific color worn. The stronger the shade of red, the more power the person possessed.

Although the practice likely existed earlier, sources suggest that Nefertiti, Queen of Egypt (14th century B.C.) colored her fingernails a ruby-red color. Nefertiti and her royal court would use henna (and sometimes even blood!) to color their nails.
The colors, that go from black to green, from red to gold, were used to define the belonging of a social class while sometimes, symbolizing the individual or tribal power. The colored nail polishes consist in real and unique representations, as traditional Incas narrations.
During the Medieval Age this practice was abandoned, and only restarted gaining popularity during the Renaissance in order to embellish the hands of noblewomen of that time. In the Victorian era, as explained in Madame Bovary – of Gustave Flaubert – with the protagonist Emma Bovary, a new nail polish became popular, made out of oil and chamois.


manicure-set


From: http://www.cosmeticsandskin.com/ded/polish.php

Until the 1930s, polishing powders were the main preparations used to shine the nails plate. These were made in many forms including sticks, blocks, pastes, loose powder and even liquids but all used fine abrasives that were buffed on the nail to produce a shine During the 1930s powder polishes were largely replaced by liquid polishes that were painted on the nails to produce a more or less instant shine. Early forms of liquid polishes were made using a variety of materials but eventually, most were formulated using nitrocellulose.


Wax polishes

rosenail

Many paste polishing powders included waxes to help suspend the powder, thicken the paste and add shine. If the abrasive was left out of this mixture then any shine produced would be due solely to the wax, which polished the nail plate in the same way that a polishing wax makes wood furniture shine.

Wax nail polishes were made as pastes or liquids and what they lacked in effectiveness they made up for in simplicity of manufacture. Paste wax polishes were simple mixtures of substances like beeswax, ceresin, spermaceti and soft paraffin, melted together and poured into small pots.

Wax polishes could also be made as a liquid by dissolving the wax in a suitable solvent, either cold or gently warmed in a steam-heated mixing bowl. When applied to the nail plate the solvent evaporated leaving a thin layer of wax behind. As the solvent used was highly volatile, these liquid polishes had to be sold in sealed stoppered bottles.


Solvents and films

Liquid wax polishes were the first nail polishes that used a solvent to deposit a film on the nail plate. The film helped protect the nail and maintain the shine for a longer period of time, thereby reducing the need to rebuff the nail. Liquid wax polishes were often applied over a nail that had first been buffed with a polishing powder – so they simply helped to preserve the polished surface – but they could also be subjected to further buffing after the wax polish had dried.

When nitrocellulose polishes appeared, the need for buffing was reduced and eventually disappeared. However, old habits died hard and reference to buffing – either before or after applying a nitrocellulose polish – were still occurring up until the outbreak of the Second World War.
Before applying varnish, if it is to be used, the nails must be well polished with the buffer and one of the various preparations now in favor, which are generally made in stone, powder, or cream form. … Never apply varnish to a nail that has not been burnished in this way; otherwise, the natural gloss of the nail will eventually disappear. … Care must be taken in its application to obtain an even surface. Work is always from the lunule down towards the fingertips.
Many French women to-day varnish from the entire base right over the nail. This is not really very becoming. The half moon showing is always rather intriguing. Dip the brush in the varnish and then press against the bottle so that only a portion remains on it; this guards against the excess of varnish, which usually results in a blob on the nail. Make an even sweep with the brush from the half-moon down to within ½ in. from the edge, or where it can be seen that the nail ceases to adhere to the flesh. The amount on the brush is usually sufficient for two lengths of the nail. Be careful not to allow the varnish to contact with the edges of the cuticle, as this spoils the effect. Allow to dry and apply a second coat, and once again when the enamel has completely dried use the buffer.

Nitrocellulose

Varnishes and lacquers


Once the idea of applying a film of polish to the nail with a suitable solvent had taken hold, the door was opened to using other varnishes and lacquers, many of which had been developed in the nineteenth century. The range of materials used included shellac, gum benzoin and cellulose nitrate (nitrocellulose). Although these liquid nail polishes appeared early in the twentieth century it took a while for serviceable polishes to be developed and for the idea to catch on.

When industrial lacquers and varnishes began to be used, it became possible to source nail polishes from larger and older lacquer firms that had the technical knowledge to deal with this dangerous material and the facilities to produce polish in bulk. This left nail polish companies with the relatively simple tasks of bottling, packaging, selling and distributing the polish meaning that they could to start with relatively small overheads. A number of new nail polish firms began in this way, perhaps the most important of which was Revlon.
The wise manufacturer selects one of the private label house to make his enamel. Elaborations and special effects can be worked out.
The danger from fire—perhaps even explosions—is so great that the risk isn’t worth the result. Private label houses in many cases have spent years in perfecting their clear lacquer. They have studied every conceivable coloring material and know its behavior in nail lacquer. Most of all they know the dangers of the business and are adequately protected.
Many successful businesses have been built in this field by delegating the manufacture of nail lacquer to the private label house.

Given the relationship with the varnish and lacquer industry, it is understandable that many early liquid nail polishes were known as varnishes or lacquers. However, they were also referred to as polishes or enamels by cosmetic companies and beauty writers of the time. Unfortunately, the story of nail polish in the twentieth century is muddied by the fact that the terms polish, lacquer, varnish and enamel were used haphazardly and covered a wide range of nail products.


Benzoin polishes


Benzoin-based nail polishes provided a reasonably good shine to the nail but they took longer to dry, required buffing to bring out the shine and had a tendency to become brownish in color, so could not compete with cellulose nitrate polishes in the long run.

Poucher (1932) provides us with a formulation for a gum benzoin polish, tinted pink with a small amount of eosin, perhaps to hide the brown, but a similar product could be made that was completely clear.

1935-nitrocellulose

Nitrocellulose polishes


Nitrocellulose – also known as cellulose nitrate – is produced by immersing cellulose in nitric acid, or a mixture of nitric and sulphuric acids, for a short time. A common source of the cellulose in the United States was cotton and when nitrated it was known there by such names as pyroxylin, nitrocellulose, nitrocotton, soluble cotton or guncotton, in part depending on the composition of the cellulose nitrate which varied according to how much the cotton had been acted on by the nitric acid.

A number of uses were found for cellulose nitrate in the nineteenth century including the manufacture of explosives, celluloid (an early plastic), nitrate film stock, varnishes and artificial silk. Some of these technologies relied on the fact that partially nitrated cellulose could be dissolved in organic solvents – like alcohol, ether, and acetone – and when these evaporated a clear film was left behind.


Collodion and liquid court plaster


Collodion was first produced in 1846 when Louis-Nicolas Ménard [1822-1901] and Florès Domonte produced a clear gelatinous liquid by dissolving pyroxylin (a partially nitrated cotton) in a mixture of ethyl alcohol and ether. Its discovery was put to good use the following year when John Parker Maynard [1817-1898], a Boston physician, discovered that dried collodion formed a clear, waterproof, protective film over a wound. Maynard’s discovery gained wide medical acceptance and led to a number of commercial forms of this liquid medical dressing being put on the market, generally badged as liquid court plasters.

Early liquid court plasters tended to contract and crack on drying but a flexible form was later developed an important advance. It used plasticisers like Canada balsam and castor oil to produce a film that could bend and flex with the skin.

In 1882, John H. Stevens [1853-1932] patented the use of amyl acetate as a solvent for pyroxylin. It produced a more durable, transparent film than that generated from using ethyl alcohol and ether, and it found a number of industrial uses including the development of nitrocellulose-based wood and metal lacquers.

Liquid court plasters were also formulated using amyl acetate rather than ethyl alcohol and ether.

Given the developments in nitrocellulose-based medical dressings, and industrial varnishes and lacquers, it was almost inevitable that someone would produce a nitrocellulose-based nail polish. Exactly when the crossover happened is open to question, with most cosmetic chemists placing this landmark event in the history of nail polish in the late 1910s or early 1920s. However, evidence suggests that it took place a good deal earlier than this. For example, the Bijou Chemical Company of New York was putting their Bijou Fluid into a nail polish/enamel as early as 1903. Given that this preparation also formed the basis for their liquid court plaster, a metal lacquer, an adhesive, and a leather waterproofer, there seems little doubt that Bijou Fluid was a flexible collodion containing nitrocellulose, and that their nail polish was nitrocellulose-based.

Unfortunately, the situation regarding liquid nail polishes produced before 1920 is far from clear. As I have already noted, there were numerous liquid nail polishes on the market before 1919, but it is difficult to know whether they were made as liquid abrasive powders, liquid waxes, liquid benzoin polishes or liquid nitrocellulose polishes, without access to their original formulation.


Nail polish and automobile paint


One reason why some have suggested that nitrocellulose nail polishes were developed in the 1920s is the belief that they were inspired by developments in glossy car paint, specifically the Duco Paint that E. I. du Pont de Nemours developed for General Motors in 1923. This seems unlikely. Although it is true that Duco Paint is based on nitrocellulose, came in a wide range of colours, and was advertised as having a fast-drying, tough, durable, waterproof finish, Duco was designed to be sprayed on not painted on, required at least twelve hours not minutes to dry, and only had a satin sheen so required further polishing to develop a high gloss (E. I. du Pont de Nemours, 1925). This, and the 1923 date suggests that the development of Duco Paint coincided with a greater use of nitrocellulose in nail polish but was not directly responsible for it; both products evolved from the varnish and lacquer industries.


Celluloid film stock and nail polish


Nitrate (celluloid) film was patented by Hannibal Williston Goodwin [1822-1900] in 1898. It was later reinvented by the Eastman Kodak Company – which started a legal dispute which was not settled until 1914. Eastman Kodak reportedly made their celluloid film stock by dissolving pyroxylin in a mixture of methyl alcohol, amyl alcohol and amyl acetate (Sabin, 1904, p. 113). Camphor was added as a plasticiser and the resulting film was then coated with a photosensitive gelatin emulsion.

Given that nitrate film was liable to catch fire, it was dangerous to store and was often sold as scrap after a movie had played out in cinemas. A nail polish could be made from this film scrap by stripping off the gelatine and then dissolving the remaining film in amyl acetate and acetone or other solvents.
The preparation used by photographers which consist of celluloid obtained from scrap sources and dissolved in amyl acetate is widely employed.
The work consists of cutting up the scrap and charging into a comparatively large mixing pan, because of the space occupied. Amyl acetate and acetone are poured into the pan, and heat gently applied.
The consistency of the product can be varied by the amount of scrap added and should be reduced to a syrupy condition. some selected perfume is then added in the usual manner and the charge emptied.

Scrap celluloid was widely used to make nail polish early on but the practice began to disappear in the 1930s. Using scrap celluloid film was cheaper but the presence of any synthetic camphor adversely affected the brightness of the finish so its use had declined by the time the Second World War broke out. When nitrocellulose supplies were diverted for the war effort there was a renewed interest in using celluloid film stock but this faded when normal supplies resumed after 1945.


Color

glazo

The first nitrocellulose nail polishes were generally made in a clear ‘Colourless’ or pink ‘Natural’ shades. The pink color was produced using dyes like carmoisine, safranine, erythrosine or phloxine. By the end of the 1920s nail color had become more obvious, with many companies making enough shades enable nail polish to match the clothing colors that a woman was wearing. Mother of pearl polishes, made by adding in fish-scale essence, also made an appearance.

Although companies like Glazo made nail polishes in a wide range of colors, manicurists could also mix up colors to meet the needs of individual clients. Unfortunately, it is clear how a manicurist accomplished this for their society clients. Some materials such as gold, silver or pearl powder could be mixed directly into clear polish as could some colors. It is also possible that manicurists first applied color to the nail and then covered this with a clear nail polish. Clients could return the following day to have it replaced with something more suitable or use a remover.
Very pink fingernails and sometimes blood red nails have been popular for some time with women in London. The latest idea, however, is to have fingernails to match dresses. At a recent function, a lady was observed in a Parma violet chiffon frock, and Parma violet fingernails to tone exactly. The idea is an off-shoot of the matching craze which is sweeping over London and Paris just now.
A well-known London beauty specialist is pushing the craze, and her clients arrive with samples of the frocks they will wear in the evening to have their nails “done!”. Mauve, violet, blues, greens, orange, yellows and reds are used. One girl wearing a pearl-colored satin frock had her fingertips enameled a lovely pearly tint, which looked really pretty. The enamel comes off quite easily with a special preparation used for the purpose so that there is no fear of one’s blue or green fingers clashing next morning with one’s favorite orange jumper suit.

Some nail polish firms used this idea as well. Cutex, for example, sold a clear nail polish in the 1920s that came with a separate tint which could be used to produce a polish with different degrees of color.

In the more somber depression years of the 1930s, bright colors went out of fashion to be replaced by subdued reds and smokey-reds.
Lately, the cult of the colored fingernail—gold, mother of pearl, blood red, or tinted to match the gown—marks us as to hand consciously. Pointed fingers with nails trained like pencil tips, and colored in unnatural tones, makes lovely hands look like the claws of some exotic bird and not the warm and human hands that have charmed lovers down the ages.

Transparent polish

With the exception of pearl and metallic types, most nail polishes used in the 1920s were transparent, either clear or colored with dissolved dyes. They were generally applied across the center of the nail, leaving the lunula (half moon) and free edge visible Having color only across the center of the nail plate was believed to make the fingers look long and elegant.


Opaque polish

By 1930, opaque (cream) nail polishes were becoming fashionable in Europe. Initially, these cream polishes were made by European companies or smaller American firms that had a presence there and only became more common in the United States after Revlon started up in 1932 and Cutex began selling them after 1934.


Revlon

history-of-cosmetics-revlon3
1932 When Revlon launched the first ever opaque nail enamel, it was referred to as cream enamel – the product was created using blended pigments, instead of dyes – this enabled a vast choice of colors. The nail enamels were only available in beauty salons to start with. 1937 The nail enamel was launched into department stores & pharmacies.

In 1939, when Revlon began to make lipsticks, they heavily promoted the notion that nail polish and lipstick should match, a fashionable French trend that had first appeared in the 1920s. Cutex had previously pushed this idea when it introduced its own line of lipsticks in in 1935.

Even earlier, two other American companies, Peggy Sage and Glazo, were producing nail polish shades to match lipsticks no later than 1930, even though neither firm made a lipstick at that date. Peggy Sage matched their nail polishes lipsticks from other companies in Peggy Sage salons and when Revlon became a much bigger threat in the late 1930s Peggy Sage entered into an agreement with seven cosmetic companies operating in the United States – Schiaparelli, Lelong, Lentheric, Charles of the Ritz, Du Barry, Dorothy Gray and Coty – to match Peggy Sage nail polishes with their lipsticks. This was a stop-gap solution with most of these lipstick manufacturers soon making their own nail polishes.


Modern nail polish


By 1930, there was a general agreement about the characteristics of an ideal liquid nail polish. It should be harmless, easy to apply, dry quickly and evenly, harden well, resist chipping and abrasion, be waterproof, have an even color that did not stain the nail, be stable in the bottle, and have a pleasant smell. Unfortunately, early nitrocellulose nail polish formulations did not share all these qualities. Their adhesion was poor if colored they often stained the nail, and they took a relatively long time to dry. Many early nail polishes did not even have a dedicated nail polish remover, being lifted by applying another layer of polish or by using acetone.
The use of nail enamel is now almost universal. It is a rapid means of acquiring a brilliant lustrous finish and may if desired, be applied without previously burnishing the nails. The only disadvantage it possesses is that of coming off in streaks after a few days. This is not very noticeable when a colorless enamel is applied, but if a tinted one has been used the effect is grotesque. Before applying the second coating of enamel, the remains of the first must be removed. This may be done by painting on the enamel itself and then rubbing off with a cloth, or better still, by using Acetone in the same way.

By the end of the 1930s, dedicated nail polish removers had been added to most manicure lines.


Components


All modern nail polishes have four main components: a film former, solvents, resins and plasticisers. Coloured nail enamels also contain pigments and pearlescent materials and may also include suspension agents to help stabilize the suspended pigments. Other ingredients such as U.V. filters and proteins were added to more recent formulations.


Film former


The film-former is the glossy coat that is left on the surface of the nail after the solvents have evaporated. As previously noted, before the Second World War a range of substances was used to generate the film – including gum benzoin, shellac, and waxes – before nitrocellulose became the film-former of choice. Since then, other film-forming substances have been proposed as substitutes for nitrocellulose – one of the earliest being cellulose acetate, also used in ‘safety film’. Although there are nitrocellulose free nail polishes on the market today, nitrocellulose is still the commonest film-former used; it has a low solvent retention and dries quickly to form a waterproof, tough film.
Nitrocellulose is outstanding for its hardness, toughness, resistance to abrasion, and excellent solvent release. It is interesting to note that nitrocellulose is also the oldest man-made substance among the film-forming agents which dry solely by evaporation and without any subsequent oxidation or polymerization.

As noted earlier, nitrocellulose comes in a range of grades depending on how nitrate it is. This affects its volatility and solubility; highly nitrated nitrocellulose being more volatile and less soluble, lower nitrate forms being less volatile and more soluble.

The second characteristic of nitrocellulose that affects its use in nail polish is the length of the polymer chains that make it up. Shorter chains result in a more brittle film that has a lower viscosity, while longer chains make it softer and more viscous. Polishes that have a low viscosity will not adhere well to the brush and will not give a thick enough coat, while those that are very viscous will not flow easily and leave a coat that is too thick and streaky. Nitrocelluloses with medium length polymer chains are the types most commonly used in nail polishes, identified as E27 and E32 in Europe or ¼ and ½ RS grades in the United States.

Plasticisers

Nitrocellulose produces a tough transparent film but as it is also brittle, the polish will crack and flake if it is used alone. To make the polish more flexible, solid and liquid plasticisers are used. Liquid plasticisers, such as castor oil, produce a soft flexible polish, while solid plasticisers, such as camphor, generate a harder film. To get the best of both worlds both types were used. Camphor and castor oil were two of the commonest plasticisers used in early nail polishes. Castor oil is no longer used and although camphor is still found occasionally in some polishes, both of these early plasticisers have been largely replaced by better substitutes.

Resins

Resins are added to nail polish to help it adhere to the nail plate so that chipping or peeling are reduced. They can also make the polish tougher and improve gloss. Two main forms are used: natural resins – like benzoin, de-waxed dammar, mastic sandarac, shellac and benzoin – and synthetic forms.

Until the 1930s, most of the resins used were natural and they suffered from a number of drawbacks. Some, like benzoin, darkened when exposed to light and most required some burnishing of the nail plate after the polish had dried to bring out the full gloss. Being natural products there was also the issues of batch uniformity and rising costs.

In 1938, the synthetic resin, toluene-sulphonamide-formaldehyde (TSFR or TSAfr), was introduced into nail polishes and gained wide use. As well as being colorless and transparent it made the nitrocellulose film tougher and improved its adhesion. Unfortunately, in 1943, TSFR was identified as a common cause of allergic contact dermatitis. Symptoms could appear around the nail but a common site of an allergic reaction was the eyelids, due to users rubbing their fingers against their eyes when their eyes were ‘tired’.

TSFR is still found in nail polishes today, generally listed either as tosylamide/formaldehyde resin or toluene sulfonamide/ formaldehyde resin, but some manufacturers avoid it. Some go even further and along with camphor and dibutyl phthalate (DBP) – an early plasticiser banned by the European Union in 1976 – sometimes specifically list TSFR as being absent.

Solvents

There are a large number of solvents that can be used for nitrocellulose-based nail polish. Selecting which to use and in what proportion depends on a number of factors including drying time, cost and odor. It might be thought that fast drying solvents would be ideal but this is not necessarily the case. If the nail polish dries too quickly the film may be streaky and the rapid evaporation can cool the polish below the dew-point causing clouding (blushing), particularly on humid days when the water content of the air is high. Best results are therefore obtained by including a range of solvents, some of which have a slower rate of evaporation.


Color

As mentioned previously, until the 1930s nail polishes were largely colored with soluble dyes like carmoisine, safranine, erythrosine, and phloxine. These were easy to incorporate into nail polish, the only major problem being that they often stained the nail.

The first nail polishes that included suspended particles first appeared in the 1920s. These were the pearl polishes – made with fish essence from fish scales – and metallic polishes – that used bronze, silver or gold metallic pigments. The use of other suspended pigments such as titanium dioxide and iron oxides occurred in the late 1920s when opaque cream polishes were developed. In the United States, these became more common a few years before the 1938 Food, Drug, and Cosmetic Act (FDCA) and the introduction by the American Food and Drug Authority (FDA) of an approved list of colors that could be used in cosmetics. By this time, the fashion for matching nail polish and lipstick had taken hold in the United States and similar pigments began to be used in both lines.

The early pearl and metallic polishes experienced a degree of sedimentation – settling out of the solid particles – but the problem became acute when cream polishes replace transparent forms. The issue was made more difficult by the fact that that sedimentation occurred at different rates for different particles. For example, pearl essence made from fish scales settled more slowly that made from bismuth oxychloride.

Of particular concern was titanium dioxide. Being white and heavier than the iron oxides it settled first, and once settled it was difficult to get it to back into the mixture. A number of solutions to the problem were tried over the years: some early polishes included a stirring stick to mix the polish before use; the iron oxides were deliberately coarse ground so that they would settle with the titanium dioxide to produce a residue that was reddish rather than stark white; the titanium dioxide was dyed so that when it settled it was not as noticeable; new ingredients were added to try to reduce the problem; bottles were designed to hide any sediment that might appear; and instructions were added that suggested shaking the bottle vigorously before use.

The ultimate solution to the problem was to develop a nail polish that was highly thixotropic, that is, one that was thick and viscous when still, but thin and less viscous when applied. A number of compounds were tried over the years but synthetic bentonite and hectorite clays proved to be the most effective and, although not without their problems, many nail polishes contain stearalkonium hectorite or stearalkonium bentonite to this day.


Base coats and top coats


One way to achieve good adherence, reduce staining and improve hardness, color and gloss were to use a base coat before applying the polish and then follow that with a top coat. The three products contained similar ingredients but differed in the amounts used. The base coat had more resin to help it adhere to the nail and reduce chipping, while the top coat contained less resin but more plasticiser and nitrocellulose to improve gloss and resistance to wear. In between these two, a layer of color was applied although top coats often contained color as well.


The first base coat (undercoat or foundation coat) appears to have been developed by Perma-Nail in New York in 1946. It was quickly followed by others including Everon (Revlon, 1946), Fulpruf Undercoat (Elizabeth Arden, 1947) and many others. I make note of this product mainly because they were the cause of numerous reports of allergic contact dermatitis. Subsequent products of this type showed similar problems.

Base coats and top coats formed a part of many professional manicures well up to the end of the twentieth century but for the average consumer they were too much trouble and in the 1950s many manufacturers made the point that their polishes did not require either, Charles of the Ritz being one of the first to do so with their Fresh Paint polishes.


Bottles


No discussion of nail polish can be complete without a mentioning their bottles. Nail polish is now sold in bottles capped with a screw top lid – to help reduce solvent evaporation – with a brush attached to the cap. However, early nail polishes came with a brush that was not integrated with the bottle but was included in the box as a separate item.

With the introduction of titanium dioxide and iron oxide pigments in the 1930s, triangular shaped bottles became more common for a number of reasons: they ensured that pigments settled on the bottom of the bottle, rather than on the sides of the glass containers; the shape also minimized any signs of floating artifacts or streaks that might appear at the top of the polish; and it also gave the bottle a low center of gravity that helped prevent it from tipping over and spilling.

The introduction of thixotrophic nail polishes made the use of triangular bottles to disguise artifacts largely redundant and enabled nail polish manufacturers to experiment with the wide variety of bottle shapes we see today.


Moon Manicure

Dita von tease

The first modern manicure was known as the “moon manicure”. To achieve this look the cuticles were cut, free edges filed into points, and polish was applied to the nail but not to the moon and tip.  Covering the entire nail with lacquer was considered extreme and improper. Red was considered the most ladylike color, but pale pink, nude, white and peach were also popular. It was considered important to choose a lacquer that would complement your outfit as well as match your lipstick.

In the 1940s and 1950s, the half moon style was still popular and there were dozens of colors introduced, including green, yellow, blue, mauve, and black. Matching nails with your clothes was still in vogue.


1960s

1960 nails

The fashions of the 1960s were far more relaxed than in previous decades. Instead of the half moon manicure, it was customary to paint the entire nail. Colors were less vibrant, including coral, purple and frosty blue hues.


1970s

1970s


Eventually, colors evolved to the full spectrum, such as various reds, oranges, and eventually the French manicure style polish, says Pattie. “The shape changed from almond-shaped to  square nails around the mid-70s through to the 90s, and French manicures became extremely fashionable.”


1980s

1980s

In the 80s creativity abounded and women went wild with nail art. This included multiple polish color applications to one nail, airbrushing, hand painting, embellishments, feathers, foil art, bright shades of pink, neon hues, real gold nails, and nail charms, Just about anything has experimented with to create designs. Longer lengths were in and a square shape. Various products were introduced to enhance the nails and their length, to include gels, tips, ‘organic’ nail powders and advanced types of acrylic blends.


1990s

ZOYA_NAIL_POLISH

After the run of nail art, consumers became more aware of their nail ‘health’ and products advanced in this direction. “Late 90s to early 2000, natural nails became popular again.” Black also had its heyday with the grunge crowd.


2000s

Nail-Art-Designs-2


Into the 2000s, nail polish colors evolved to every and all shade. Various gel products and gel polishes were introduced, 3-D nail art, glitter, and Japanese style art are now seen on all types and classes of women. The shape has also gone back to the original almond shape and even to a more dramatic stiletto shaped nail.


Now

nails 2000s

Recently, the evolution of nail appliqués has become the biggest trend,  The first appliqués were introduced by the Minx brand in 2007, and now Dashing Diva is the innovator in the field, offering appliqués with embellishments to make producing the popular 3-D art styles a breeze for anyone.  Gel polishes are also trendy, although removal is difficult.


Modern nail polish

nail polish production machine 3


from: http://www.encyclopedia.com/topic/Nail_polishes.aspx


Modern nail polish is sold in liquid form in small bottles and is applied with a tiny brush. Within a few minutes after application, the substance hardens and forms a shiny coating on the fingernail that is both water- and chip-resistant. Generally, a coating of nail polish may last several days before it begins to chip and fall off. Nail polish can also be removed manually by applying nail polish “remover,” a substance designed to break down and dissolve the polish.


Raw Materials

Nitrocellulose

There is no single formula for nail polish. There are, however, a number of ingredient types that are used. These basic components include film forming agents, resins and plasticizers, solvents, and coloring agents. The exact formulation of a nail polish, apart from being a corporate secret, greatly depends on choices made by chemists and chemical engineers in the research and development phase of manufacturing. Additionally, as chemicals and other ingredients become accepted or discredited for some uses, adjustments are made. For example, formaldehyde was once frequently used in polish production, but now it is rarely used.

The primary ingredient in nail polish is nitrocellulose (cellulose nitrate) cotton, a flammable and explosive ingredient also used in making dynamite. Nitrocellulose is a liquid mixed with tiny, near-microscopic cotton fibers. In the manufacturing process, the cotton fibers are ground even smaller and do not need to be removed. The nitrocellulose can be purchased in various viscosities to match the desired viscosity of the final product.

Nitrocellulose acts as a film forming agent. For nail polish to work properly, a hard film must form on the exposed surface of the nail, but it cannot form so quickly that it prevents the material underneath from drying. (Consider commercial puddings or gelatin products that dry or film on an exposed surface and protect the moist product underneath.) By itself or used with other functional ingredients, the nitrocellulose film is brittle and adheres poorly to nails.

Manufacturers add synthetic resins and plasticizers (and occasionally similar, natural products) to their mixes to improve flexibility, resistance to soap and water, and other qualities; older recipes sometimes even used nylon for this purpose. Because of the number of desired qualities involved, however, there is no single resin or combination of resins that meets every specification. Among the resins and plasticizers in use today are castor oil, amyl and butyl stearate, and mixes of glycerol, fatty acids, and acetic acids.

The colorings and other components of nail polish must be contained within one or more solvents that hold the colorings and other materials until the polish is applied. After application, the solvent must be able to evaporate. In many cases, the solvent also acts a plasticizer. Butyl stearate and acetate compounds are perhaps the most common.

Finally, the polish must have a color. Early polishes used soluble dyes, but today’s product contains pigments of one type or another. Choice of pigment and its ability to mix well with the solvent and other ingredients is essential to producing a good quality product.

Nail polish is a “suspension” product, in which particles of color can only be held by the solvent for a relatively short period of time, rarely more than two or three years. Shaking a bottle of nail polish before use helps to restore settled particles to the suspension; a very old bottle of nail polish may have so much settled pigment that it can never be restored to the solvent. The problem of settling is perhaps the most difficult to be addressed in the manufacturing process.

In addition to usual coloring pigments, other., color tones can be added depending on the color, tone, and hue of the desired product. Micas (tiny reflective minerals), also used in lipsticks, are a common additive, as is “pearl” or “fish scale” essence. “Pearl” or “guanine” is literally made from small fish scales and skin, suitably cleaned, and mixed with solvents such as castor oil and butyl acetate. The guanine can also be mixed with gold, silver, and bronze tones.

Pigment choices are restricted by the federal Food and Drug Administration (FDA), which maintains lists of pigments considered acceptable and others that are dangerous and cannot be used. Manufacturing plants are inspected regularly, and manufacturers must be able to prove they are using only FDA approved pigments. Since the FDA lists of acceptable and unacceptable pigments change with new findings and reexaminations of colors, manufacturers occasionally have to reformulate a polish formula.


Today’s Manufacturing Process


The modern manufacturing process is a very sophisticated operation utilizing highly skilled workers, advanced machinery, and even robotics. Today’s consumers expect a nail polish to apply smoothly, evenly, and easily; to set relatively quickly, and to be resistant to chipping and peeling. In addition, the polish should be dermatologically innocuous.

Mixing the pigment with nitrocellulose and plasticizer
1 The pigments are mixed with nitrocellulose and plasticizer using a “two-roll” differential speed mill. This mill grinds the pigment between a pair of rollers that are able to work with increasing speed as the pigment is ground down. The goal is to produce a fine dispersion of the color. A variation of this mill is the Banbury Mixer (used also in the production of rubber for rubber bands).
2 When properly and fully milled, the mixture is removed from the mill in sheet form and then broken up into small chips for mixing with the solvent. The mixing is performed in stainless steel kettles that can hold anywhere from 5 to 2,000 gallons. Stainless steel must be used because the nitrocellulose is extremely reactive in the presence of iron. The kettles are jacketed so that the mixture can be cooled by circulating cold water or another liquid around the outside of the kettle. The temperature of the kettle and the rate of cooling are controlled by both computers and technicians.
This step is performed in a special room or area designed to control the hazards of fire and explosion. Most modern factories perform this step in an area with walls that will close in if an alarm sounds and, in the event of an explosion, with ceilings that will safely blow off without endangering the rest of the structure.

Adding other ingredients
3 Materials are mixed in computerized, closed kettles. At the end of the process, the mix is cooled slightly before the addition of such other materials as perfumes and moisturizers.
4 The mixture is then pumped into smaller, 55-gallon drums, and then trucked to a production line. The finished nail polish is pumped into explosion proof pumps, and then into smaller bottles suitable for the retail market.
Quality Control

Extreme attention to quality control is essential throughout the manufacturing process. Not only does quality control increase safety in the process, but it is the only way that a manufacturer can be assured of consumer confidence and loyalty. A single bottle of poor quality polish can lose a customer forever. Regardless of quality control, however, no single nail polish is perfect; the polish always represents a chemical compromise between what is desired and what the manufacturer is able to produce.

The nail polish is tested throughout the manufacturing process for several important factors (drying time, smoothness of flow, gloss, hardness, color, abrasion resistance, etc.). Subjective testing, where the mixture or final product is examined or applied, is ongoing. Objective, laboratory testing of samples, though more time consuming, is also necessary to ensure a usable product. Laboratory tests are both complicated and unforgiving, but no manufacturer would do without them.


DIY Nail Polish

Make-Your-Own-Nail-Polish


from: http://www.girlishh.com/how-to-make-natural-fingernail-polish/


Recipe 1
Mix a tablespoon of Olive Oil, cold and pressed, with half a tablespoon of Kaolin Clay Powder, or White Clay and make them into a paste. Olive Oil helps moisturize cuticles and nails, while clay will bring shine to the nails.
Add henna dye to the nail polish to get a color. Henna comes in different colors and can give a natural shade to your nail polish. Make a paste from Olive Oil and henna that is smooth.
Use an old brush or cotton swab for applying polish on nails evenly. Keep it on for fifteen minutes. If you are going to use henna for tinting nails, wipe out leftovers on the skin and air dry the nails.
If you are coloring your nails with henna, moisturize them often. A cotton swab immersed in warm water is enough to dab on the surface. You should leave the polish on for a minimum of one hour.
When the paste dries off, use a damp cloth to wipe away the nails. Gently rub to buff your nails. To get natural gloss, you should repeatedly apply this.

Recipe 2
Gather 3 tbsp Olive Oil, 2 tsp Alkanet Root, 1/4 tsp Beeswax, and two drops of Vitamin-E Oil. Heat the Olive Oil and Alkanet Root. When they are warm, remove from heat and allow them to set.
Use a good mesh strainer to strain the blend and separate Alkanet. Strained oil should once again be put into the boiler. Add beeswax to the oil and let it melt. After this, you can mix in the Vitamin E Oil. Mix and remove. With an old brush, apply the nail polish evenly on the nails. Do not smear it on the skin that surrounds it.

Recipe 3
Henna has been growing in popularity as a natural dye. It has been widely used in the East for many centuries. It is found to be very safe while giving an attractive color to your nails. It is easy to make a natural nail polish from henna.

Firstly, mix water and red henna in a small container. Stir the mixture until a fine paste form. Henna is made from herbal leaves that are dried before being ground to fine powder. You can purchase red henna from most of the local health food shops or online.

Next, paint the henna carefully on your nails; fingers or toes. Use a clean and small paint brush; paint slowly so that no henna will get onto your skin. When you are done, let your nails dry naturally.
Once the henna polish is dry, wash your hands. As the henna polish is really a stain, there is no worry of chipping or smearing like the commercially prepared nail polish. Henna polish will stay permanently on your nails as you have applied it until your nails grow out. Do not keep the remainder of the henna polish. Make a fresh paste each time you want to polish your nails again.


https://youtu.be/maHStEQ9_dM


81FfN+QiyCL._SX522_

Zoya Naked Manicure Mini Professional Kit


The ultimate custom color blending kit for any Naked Manicure lover including 0.25oz bottles of all six perfectors (Pink, Buff, Nude, Mauve, Lavender and White Tip), plus Naked Base, Satin Seal Topcoat, and Glossy Seal Topcoat. Perfect for travel or for gifting!


51V4OocOdSL._SX522_

Heavenly Haze – Nail Polish; Non-Toxic, Vegan, and Cruelty-Free


Karma Organic Nail Polishes are 7 free contain no toluene, formaldehyde, DBP (phthalate), camphor, formaldehyde resin, n0 xylene, and parabens. are safe for pregnant women, kids, cancer patients, and allergy sufferers. Chip resistant, durable, and with no harsh odors, they are available in glossy, matte and glow-in-the-dark shades. The non-yellowing formula is cruelty-free (not tested on animals). Packaging is 100% recyclable. This nail strengthener contains calcium and coffee extract to help strengthen natural nails without the use of Formaldehyde. Weak, thin, splitting nails or peeling nails will benefit from the use of this product which is free of Toluene and DBP, as well as Formaldehyde.


71FTfZf+FvL._SX522_

Nail Polish Remover – 100% NATURAL & Plant Based – USDA BioCertified – NonAcetone – Also Acts As Conditioner & Strengthener For Nails & Cuticles


  • UNLIKE MOST OTHER ACETONE FREE REMOVERS Pure Vitality Beauty nail polish remover is also free from Acetate, Ethyl Lactate & Petroleum Chemicals – all of which are harmful with repeated or prolonged exposure.
  • HIGH PERFORMING WITHOUT DRYING OUT YOUR NAILS – Will strengthen & moisturize your nails, unlike traditional nail polish removers which leave you with weak, brittle fingernails and toenails. Even removes stubborn UV gel nail polish!
  • ALL INGREDIENTS RATED 0 OR 1 IN THE COSMETIC SAFETY REVIEW by the Environmental. Working Group’s Skin Deep database. Pure Vitality Beauty nail polish remover is nonhazardous, non-toxic, non-carcinogenic and pregnancy safe.
  • ECO-FRIENDLY – biodegrades quickly and fully. No chemical fumes to pollute the air. Cruelty-Free.


100_-pure-creamy-nail-polish-pepper

100% Pure Creamy Nail Polish – Pepper


Apply 100% Pure Horsetail Base Coat first for strong, healthy nails with a smoother surface. Apply one coat of nail polish color. After the first coat dries, apply a second coat. Finish with 100% Pure Glass Top Coat for a chip-free high gloss finish.


UGG Marciela

The Bailey Button is all grown up. Meet the UGG® Marciela boot, all the comfort in a smartly accented package.
Twin faced sheepskin uppers with heel guards for added structure.
Boot cuff can be worn up or folded over depending on style preference.
Leather tab and metal button detail.
Fully lined in luxurious, UGGpure™ wool. It’s a luxurious, natural wool woven into a durable backing that enhances the overall product experience. UGGpure delivers a plush sensory experience with every wear.
Generously cushioned footbed is lined in UGGpure™ wool for breathability and warmth.


Mascara History, Tips, Vegan Recipes, And Tutorials


Mascara and Lashes
Lusccious lashes 136786013

Welcome to our blog, thank you for visiting and the very welcome likes and shares that you do. We truly appreciate it, without you, it would not be a blog.

This week 275 we are sharing lots of tips, history, and facts about mascara. In my personal makeup, I can go without many steps but definitely not without mascara. The eyes are such an important part of our expressions and they reflect not only the state of our moods and health but at the same time our deepest inner being. There is a saying that the eyes are the windows to our soul. With that said we will take you into the mascara world, we are sharing the use of it and how mascara came about. It is quite fascinating for us to know the history of products and how they came about it makes the products a collaborative effort just to acknowledge the effort that went into it. Aside from knowing what we are placing on our bodies, thank you for your time and attention.


No eye makeup is complete without the frame that lashes curled and defined can give to the final look.  For a semi-permanent solution ideal for vacation consider having your lashes color tinted, but for every day there are mascaras to color, thicken, volumize, lengthen, curl and condition.  Waterproof formulas withstand rain, tears, and swimming they can be a very helpful for wearers of contact lenses.  Clear mascara gives a dewy look to natural lashes and can also be used to hold brows in shape and tame the stubborn hairs.


History of Mascara


Mascara started thousands of years ago, early examples of those attempts can be found in the archaeological research at several ancient civilizations digs such as Mesopotamia and Assyria, where dust of ground precious stones were used to decorate women’s lips and eyes, but the true revolution of mascara for eye-related cosmetic products was found to came from Ancient Egypt.

egypt-eye makeup

Egyptian society slowly built fashion that integrated not only with their medicine but at the same time with their religion and deep beliefs. Egyptians viewed fashion as a way to honor their beliefs, and a majority of the population used Facial and body painting on a regular basis. Eyelash and eyelid products that appeared at that time speak of a substance called kohl it was one of the most widely used cosmetic products in both ancient and to this day in the Middle East culture, it was made from charcoal or soot, honey, water and strangely enough, from crocodile stool, wow who would have thought!!


Kohl and ground up minerals 

Khol and ground Cristals for make up


Ancient Egypt Eye Makeup Applicators


Antien Egypt eye make up applicators

They used this tools it to darken eyes, eyelashes, and eyebrows, protect their eyes from harmful dust and microorganisms that were blown by the wind, (we tend to forget that eyelashes are for protection of our eyes that is their main role) and of course, this substance and accompanying applying ritual was a part of their religion (most often it represented preservation of wearer soul against harmful evil spirits) and still that is a reason to wear eye make up in certain ways in many cultures.


Eye Makeup as a protection in Egypt


egyptian-eye-make-upasprotection


In Ancient Egypt, men used to style their lashes just as often as women. They used kohl and ointments to darken the lashes, which also served as protection for their eyes from the sun’s harmful rays, dust, wind, and natural elements. Women also used malachite on their lashes as they believed it worked as an aphrodisiac Hmmm that’s a thought!maybe we should give it a try!

After the fall of Rome, Europe fell into dark times, in this era when cosmetics were viewed as vanity items of rich and powerful people. The changed during the reign of English Queen Victoria (1837 – 1901, fashion style continued to live until 1912) cosmetic products and elaborate clothing became a major part of woman life of mid-class and high social classes. Elaborate beauty routines, the assortment of complex fashion styles, and public promotion of cosmetic pushed women to spend many hours a day applying and maintaining makeup on their faces. Mascara represented a very important part of every woman cosmetic collection, and the illusion of dark and long eyelashes became their obsession.

Victorian women are really into their makeup, and with painters from the Pre-Rapahelite Brotherhood celebrating lovelies with extremely long lashes, mascara formulations once again abound. Recipes include everything from a blend of ashes and elderberries to lampblack, which is the sticky soot from oil lamps (very toxic).

It was in 1913 when French chemist and perfumer Eugène Rimmel produced the first industrial made non-toxic mascara. This product was far from perfect, messy and inconsistent, never the less it managed to become massively popular across Europe, South America, and other continents, where several countries still call mascara products as “Rimmel” and in Chile where I am from we still do. Worldwide acceptance of mascara came from the mind of T. L. Williams who devised very similar packaging and formula as Rimmel, but he managed to market it better and eventually form his company “Maybelline” which is even today well known  for their mascara he created the first modern day mascara by mixing coal dust and petroleum jelly. Ouch!!!! Toxic right?

Modern mascara gained large popularity only after much promotion and marketing by Helena Rubinstein (1870 – 1965). Her influence and constant promotions by various movie actresses of 1930s, 40s, and 50s made mascara socially acceptable in any situation and an important part of almost every fashion style makeup all over the world.

Eyelashes are as a natural rule about one-third as long as the eye is wide and this is the ideal length for diverting airflow to keep eyes from drying and protect them from the elements, our main takeaway is that they’re just as consequential to our eyes health as they are important for our vanity.


The first nontoxic Rimmel Mascarafirst-non-toxic-mascara-by-rimmel

Maybelline Cream Mascara 

bd5fb6c8184d08bb39d9a4b7283fb951

Maybelline Cake Mascara


Maybelline cake mascara

Different Mascara Wands

Great mascara aplicators

mascara-brushes


Mascara 101aplicators

Big Eye and Brush 121396087 (1)

Asian Girl mascara 147670433 (1)


TIP:  I only use waterproof mascara in a special situation I don’t regularly do, because it tends to dry the lashes, it coats them and doesn’t let them breath, aside it is hard to remove and promotes rubbing the delicate skin of the eyes and under the eyes, and irritates the skin by  that, is best to give a place for that kind of mascara when is an absolute must.


Color:  Black mascara defines the eyes like nothing else and works with almost any look, but electric blues and deep purples can also be stunning, so don’t be afraid to experiment.  Dark brown mascara is generally softer and more flattering for mature faces, keep in mind that a reddish mascara can make you look tired and the eyes look irritated like you have an allergy or have been crying.


Application:  Whatever formula you choose, here is a foolproof guide to applying mascara:


1. Make sure the mascara wand is not overloaded so that the product is less likely to come into contact with the skin and you get a stain if you have concerns due to hooded lids is wonderful shields in the market to prevent mascara to stain the skin.  Look down and stroke the wand over the top of the upper lashes from roots to tips you can hold the lid gently upward that helps you reach the roots without getting it on the lid.  Move along from one corner of the eye to the other until every lash is coated I usually move my eyeball to the opposite corner so I can get in closer also is a large assortment of brushes that can aid you with the process always be conscious of not harming your eyes I have seen and experienced my self, eye injuries from misuse of the mascara wand.

2. With the eyes wide open, stroke the wand up the upper lashes from underneath, starting at the roots and sweeping up to the tips.  Move along as before from one corner to the other until every lash is coated.  Repeat, but this time move the wand up the lashes in a zigzag motion to coat the sides of each lash.

3. To add more volume to the roots of the upper lashes, hold the wand vertically and push it directly up into the roots, working your way along from corner to corner I prefer the outer longer lashes with a thicker amount of mascara due to the fact that if  I place thick amount in the inner corners I give my self a crosseyed look.

4. To coat the lower lashes, hold the wand vertically and sweep it from side to side over the lashes, being careful not to let the wand touch your skin, it helps to open your mouth and pull your lower jaw down that way you stretch the skin naturally without pulling it too hard.


TIP:  I like to use an eyeliner brush to coat the roots, that way I prevent my self from touching the skin and at the same time I clean any eyeshadow that got in the lashes which will show the mascara as fake and not so natural.


TIP: You can purchase or make your own Mascara shield with rice paper and stick it to the skin with your foundation or a little bit of moisturizer so it doesn’t move, it will help you prevent getting it on the skin.


TIP:  I personally don’t use mascara on the lower lashes on every person, only on certain eye shapes, it can create the effect of a droopy eye everyone is different use your discretion.


DO Wipe the brush clean before you first apply a brand new mascara you can do this on the edge of the tube when you are pulling the brush out make sure you don’t get it at the outer rim or it can prevent your top from closing properly and it will cause your mascara to dry. That way you get a feel for the brush and how much to load up for maximum effect minimum flick back, that way is no clumps that can transfer to your skin. Clumpy lashes are the result of applying too much product or having moisturizer or any oil on your lashes or that your mascara needs to retire because or reach the end.

Using a light touch and an eyelash comb or brush used before mascara has dried will help fluff the lashes and remove excess product, you can use a mascara spun to do the trick.

DON’T Rely on one mascara to do it all! Consider mascara wardrobing like you do with your clothes – using more than one mascara – you create your desired look to suit your lash needs and overall look. For instance, if you have short, sparse lashes and crave length and volume begin with a lengthening formula and slim brush design to extend lashes followed by a curved or bigger brush combined with a thickening formula to add volume to upper lashes just customize it to your needs.

DO  I like to moisten lashes with a clean, wet brush or Qtip prior to applying mascara. I learned that by doing this it allows the mascara to go on more smoothly and evenly. Remember to apply the product starting at the lash base and working outward to the ends of the lashes.

DON’T Pump  Don’t pump the wand in and out of the tube. This action does not coat the wand with more mascara any better and only causes the mascara to dry out faster by introducing air into the container and most likely messing up the brush and coating the entrance of the tube with product, which will prevent closing the tube airtight.

DO  You can Layer it, usually people apply just one or two coats of mascara to lashes; however, in many cases, you may actually need three or four layers to get the desired look again that depends on your judgment. In the case of short, thin lashes, try mixing mascaras. You can first start by applying a layer of mascara that is made to lengthen lashes. Then add a layer of mascara made for thickening the lash. Try what works for you. It is good to do a bit of research and collect pictures of looks you like and then practice.


Don’t, the answer is a big NO  Add any other products to your mascara in the tub. Somebody once asked me if adding water or moisturizer to extend and thin out the mascara was okay the answers a big NO!!! it will ruin the product and it may not be safe for the eyes.


Duration of a mascara to be safe  Is best to discard the  mascara after 2 or at most 3 months perhaps sooner and this depends on how much usage the mascara is put through, I personally keep it to one month be the judge if you notice that the mascara is losing its shine that means is getting dry and it would not give you the results that you spect and it has turned. Our lashes are designed to catch bacteria, dirt, and anything that pose a danger to your eyes so usually, the mascara brush brings a few of those invaders into the tube of mascara. The environment inside the tube it is wet and dark Hmmm! great grounds for bacteria and other invaders to proliferate and we talking your eyes here. Using a new mascara is a lot cheaper than an eye infection not to mention the risk and pain and the danger of having permanent damage to your eyes.

For safety and hygiene purposes, NEVER test mascaras at the cosmetics counter even with the throwaway mascara wands, you don’t know if people introduce the wand a few times when trying the product before you I personally had a very bad experience by doing this.

For more tips, this is a great site

http://www.paulaschoice.com/expert-advice/eyes/_/makeup-tips-tricks-mascara#dos 


 Mascara Shields

Elf-Mascara-and-Eyeliner-Shield-3


DO  Hold your brush like a pro and go vertical as well as horizontal strokes. when you use the tapered end of the brush it allows you to push lashes up for a wide-eyed look now days is so much selection of brushes that are specially designed for this purpose.

DON’T  Is best not to load up to much mascara to lash tips as that makes them heavy and result in the dreaded droopy look Place your focus on the roots and pulling the wand through to tips.


Recipes to make your own Vegan mascara:


Vegan homemade mascara

1tsp Candelilla Wax

1.5 tsp Jojoba Oil or Argan Oil

1 tsp Black Iron Oxide

1/4 tsp Zinc Oxide

This will make 5 to 6 pots

Here please make sure that all the utensils that are used to make the mascara are sanitized and the same with the container that you will use to keep the final product is no worth a risk to hurt your eyes otherwise.

How to make it:


Begin by mixing the black iron oxide and zinc oxide until well blended.

Place a small glass or metal bowl over a pot with water over low heat on the stove, add the wax to it and the oil and let it sit until completely melted do not boil the mixture when it starts to melt mix well.

Add the mixture to your sanitized pots and press down with a piece of cloth like gauze or cheesecloth, you can press it with the back of a spoon. Let the mixture set and dry before using.

A great way to transfer your finished mixture to the pot is to use a large syringe or a small pastry bag,  you can also make a cone by cutting the end of a strong plastic bag, it is a bit messy this way.

Cake mascara is well applied with a spoolie brush or a brow brush.

If for some reason your mixture is runny, add a bit more Iron Oxide until desired consistency, I always like to add more color for certain recipes so you get a fuller and luscious look.


Creamy Mascara Recipe


Ingredients 

1/2 tsp Carnauba Wax

1/2 tsp Candelilla Wav

1/4 tsp Cocoa Butter

1  tsp  Jojoba oil

2 drops of preservative Sodium Benzoate or Potassium Sorbate

1 1/2 tsp pigment color use 2 tsp for pigment with Mica

This mixture makes 6 tubes or more


Colors 


Black  use 1 1/2 tsp black Iron Oxide

Brown use 1 1/2 tsp brown Iron Oxide

Black Brown use 1 1/2 tsp black Iron Oxide and 1 tsp brown Iron Oxide

Blue use 1/2 tsp black Iron Oxide and 1 1/2 tsp deep blue mica, you can apply different color micas for desired look.


How to make it:

Mix your color pigments together using a coffee grinder or a mortar ( like you are making guacamole) or a Ziploc bag.

Place a glass bowl over a pot of water on a low heat on your stove.

Add the waxes, butter, and oil to the bowl and let it sit until melted, do not boil and mix well.

Add the pigments slowly so you don’t create lumps, mix well until is a smooth paste, little whisk works really well.

Add your preservative and mix well

A safe preservative to use that are safe for eyes

is Potassium Sorbate

According to  https://blog.honest.com/what-is-potassium-sorbate/#


Ingredient: Potassium Sorbate


What it is: Potassium sorbate is a salt of a sorbic acid which is naturally found in some fruits (like the berries of mountain ash).  The commercial ingredient is synthetically produced creating what is termed a “nature identical” chemical (chemically equivalent to the molecule found in nature).

What it does: Fights bacteria. Most personal care products are made with a lot of water and a variety of nutrients which makes an incredibly hospitable breeding ground for microorganisms. What’s worse – the product might smell and look just fine, but be swarming with bacteria or fungi  Effective preservatives are vital for ensuring safety!

Transfer the mixture to the mascara tubes.


Vegan Eyelash Conditioner Recipes


from: http://www.fashionwithaconscience.org/2012/11/16/how-to-grow-long-eyelashes-naturally/
Most of us crave full and natural lashes. Though we can’t change the lashes we have from the inside, we can use topical treatments to help them grow healthier and longer. There are a number of different eyelash serums and growth conditioners you can purchase from the store or have prescribed from your dermatologist. They have their benefits and risks so be sure to do your research or talk with your dermatologist to see which product would suit you best. There are a number of different natural remedies to create your own homemade eyelash conditioners. Results will not come overnight but over a period of weeks–possibly months–so be prepared for a slow process. Take a break from mascara and curling your lashes once in a while to give them a break from all the lash stress. Give these natural eyelash conditioners recipes a try to achieve longer, thicker, and fuller lashes!


Coconut Oil Eyelash Conditioner

Ingredients:
– Coconut Oil
– Extra Virgin Olive Oil
– Vitamin E Oil or capsules
– Small clean container
– Disposable mascara wands or cotton swabs

Pour equal parts of each oil into a small container. Note that coconut oil is solid at room temperature but melts when warmed or mixed with other oils. Dip your mascara wand or cotton swab into the mixture, remove the excess and apply it to the root of your lashes twice a day. Make sure to use the conditioner on clean lashes.
Avoid using your fingers to apply the conditioner to your lashes because they can transfer bacteria into the mixture and also absorb the oils. Mascara wands and cotton swabs are precise and ensure that every one of your lashes benefits from the goodness of your homemade eyelash conditioners.
Try one of these recipes and let me know how you are liking them. Also, if you have your own recipes please share them with us so we can all grow beautiful, long, voluminous lashes.


Vitamin E Eyelash Conditioner

from: http://www.beautylish.com/a/vmyvn/diy-lash-conditioner


Ingredients:
1 Vitamin E oil or capsules
2 Small container or plate
3 Cotton Swabs
You can use vitamin E capsules or vials of oil to use as an eyelash conditioner. Squeeze or add a few drops of vitamin E oil into your clean container or plate, making sure not to touch the oil with your fingertips. Dab the cotton swab in the oil and sweep the swab across clean eyelashes from root to tip on both sides of lashes, twice a day (typically in the morning before makeup application and before you go to bed).


Longer Lash Conditioning Serum

from: http://hellonatural.co/eyelash-conditioning-serum


Ingredients:
• 2 tablespoons castor oil
• 2 tablespoons 100 percent aloe vera gel
• Jar with a lid
• Q-tips or clean mascara wand

Instructions
1 Combine castor oil and aloe vera in a small container with a lid.
2 Shake to combine before each use.
3 Apply nightly to lashes with Q-tip or mascara wand.
4 Do not rinse.


For more information watch the videos below:


https://youtu.be/xJ0Ig6qx-JU


Faux Cils Longest Lash Mascara

the-mascara

CLE DE PEAU  The Mascara

youngblood-outrageous-lashes_1_

Youngblood Outrageous Lashes Mineral Lengthening Mascara

Youngblood Outrageous Lashes Mineral Lengthening Mascara nourishes and volumes the lashes while increasing length and definition to get you noticeably gorgeous lashes. The long-wearing, non-flaky, smudge-proof formula is everything you want in a mascara.